Ostorlab Integration with Appcircle
Overview
Ostorlab scans every successful Appcircle build automatically. Appcircle is a mobile CI/CD platform that builds, signs and distributes Android and iOS applications. When a build succeeds:
- Appcircle notifies Ostorlab through a webhook when a build finishes.
- Ostorlab downloads the build artifacts and extracts the application. If the build exports both an Android and an iOS application, Ostorlab starts a separate scan for each.
- Ostorlab starts a scan with the scan profile you chose and records what it did in a delivery history.
The integration works with Appcircle cloud and with self-hosted Appcircle installations.
You can also start the scan from a step of your Appcircle workflow instead of the webhook. The step can wait for the result and fail the build when the risk rating is too high. See Run Ostorlab as a Workflow Step.
Note
Fast Scan, Full Scan and Privacy Scan are supported. The other scan profiles are not supported yet.
Watch the setup from the personal access key to the delivery history:
Before You Start
- An Ostorlab account with the permission to manage integrations.
- An Appcircle account that can read the build profiles you want to scan.
- A build workflow with the Export Build Artifacts step, so the APK, AAB or IPA is among the exported artifacts.
- For iOS, a build profile with a signing identity. Without one, Appcircle exports an Xcode archive and no IPA, and Ostorlab has nothing to scan.
Create an Appcircle Personal Access Key
Ostorlab uses a personal access key to download the build artifacts from Appcircle.
- In Appcircle, click Organization in the left menu, then Security.
- Under Personal Access Key, generate a new key.
-
Copy the key. Appcircle shows it only once.
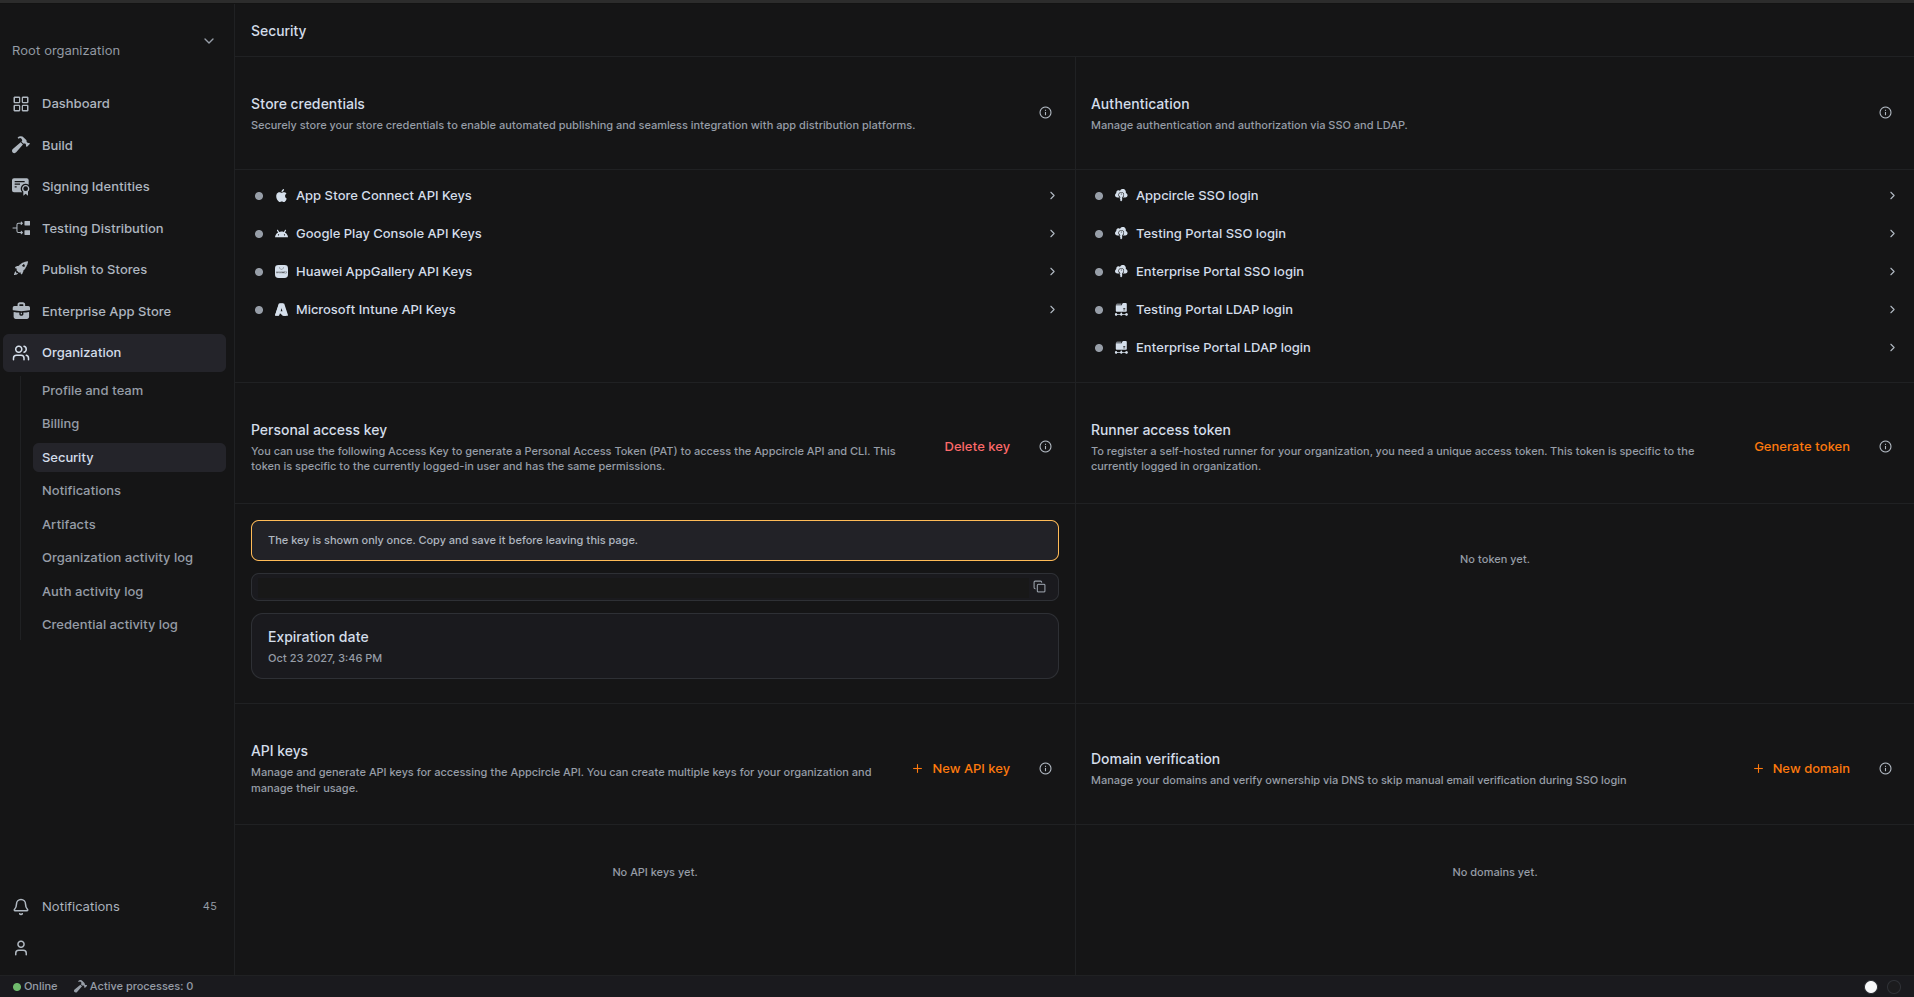
The key inherits the permissions of your user in the organization, so use an account that can read the build profiles you want to scan.
Create the Configuration in Ostorlab
-
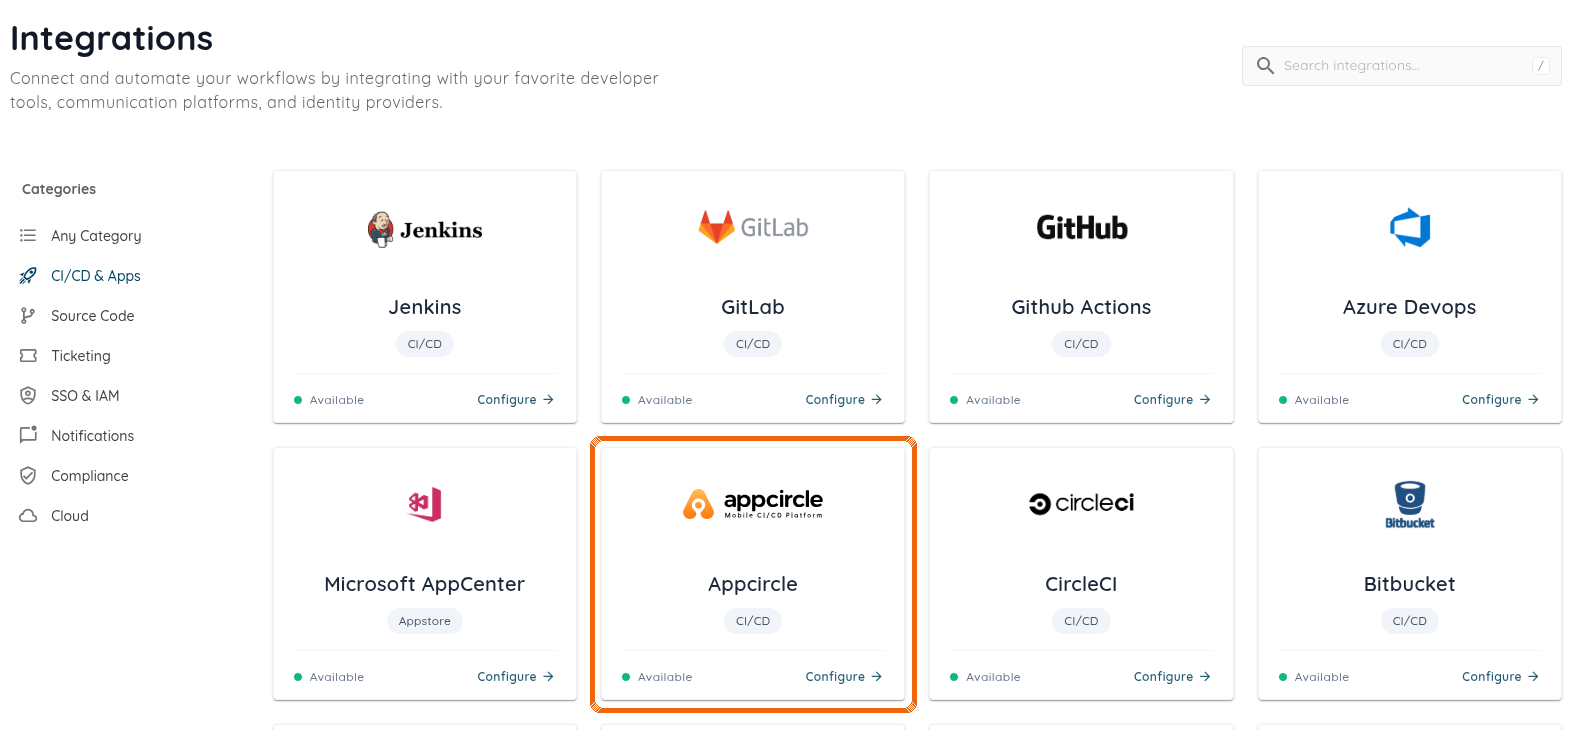
Open the menu, expand Library and go to Integrations. Pick the CI/CD & Apps category and select Appcircle.
-
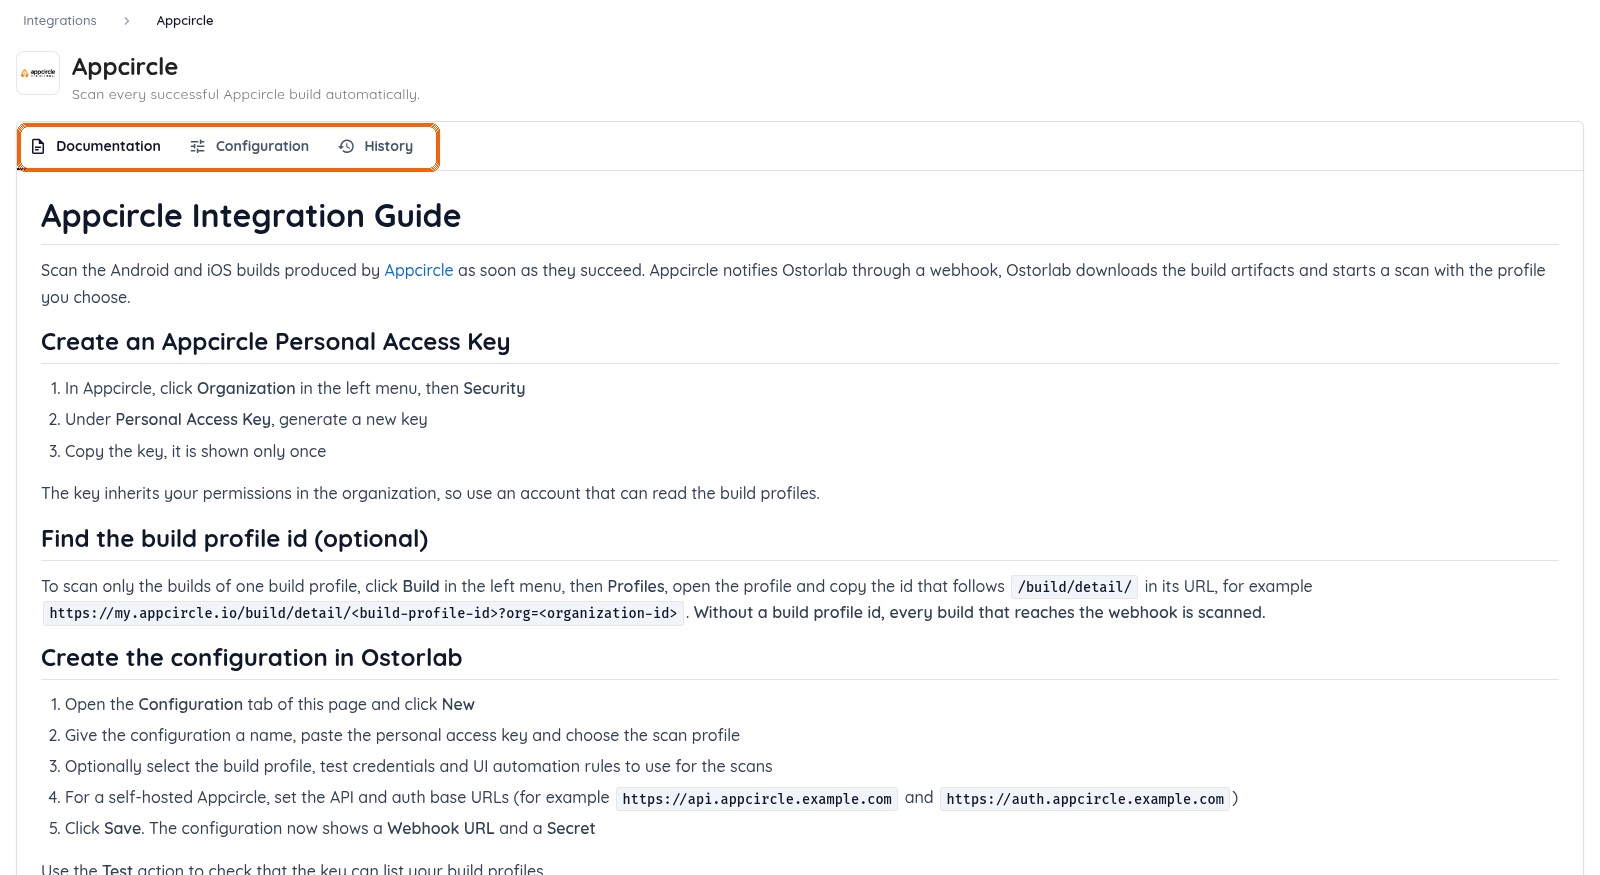
Select Appcircle. The Documentation tab holds this guide, and the Configuration tab holds your configurations.
-
Open the Configuration tab and click New configuration.

-
Fill in the form:
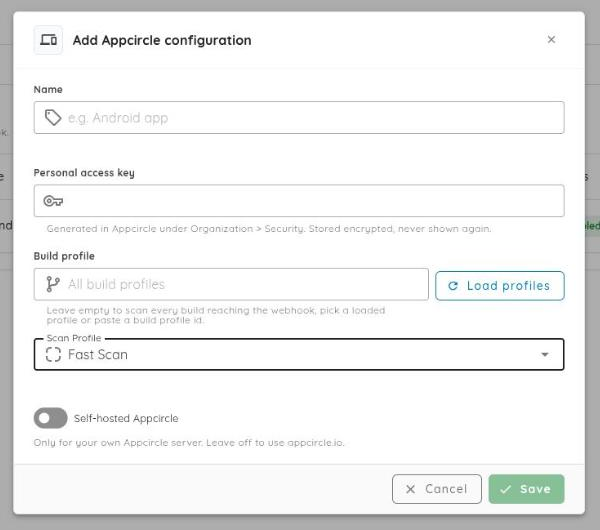
- Name: a name for the configuration.
- Personal access key: the key copied from Appcircle. It is stored encrypted and never shown again.
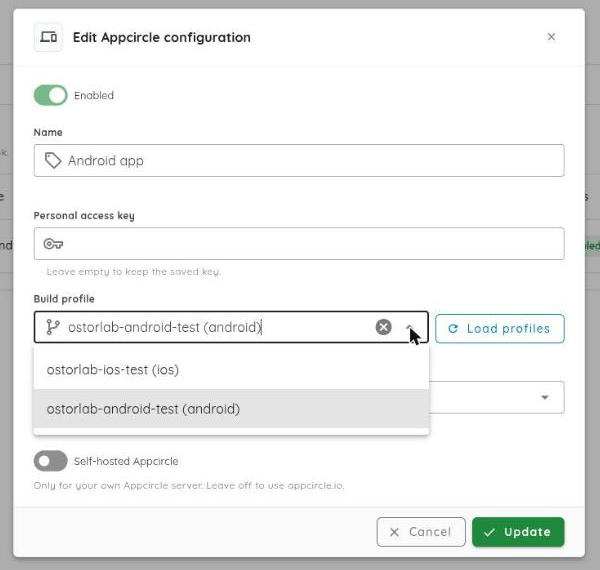
- Build profile: optional. Click Load profiles to pick one of your Appcircle build profiles, or paste a build profile ID. Leave it empty to scan every build that reaches the webhook.
- Scan profile: Fast Scan, Full Scan or Privacy Scan.
- UI Rules and Test Credentials: shown for the scan profiles that use them (not for Fast Scan). They are attached to every scan the configuration creates.
- Self-hosted Appcircle: turn it on for a self-hosted installation and fill in the API base URL and the auth base URL, for example
https://api.appcircle.example.comandhttps://auth.appcircle.example.com.
-
Click Save.
Pick the Build Profile
Load profiles lists the build profiles the key can see, with their platform. If Appcircle refuses the key, the message tells you why.
Pick UI Rules and Test Credentials
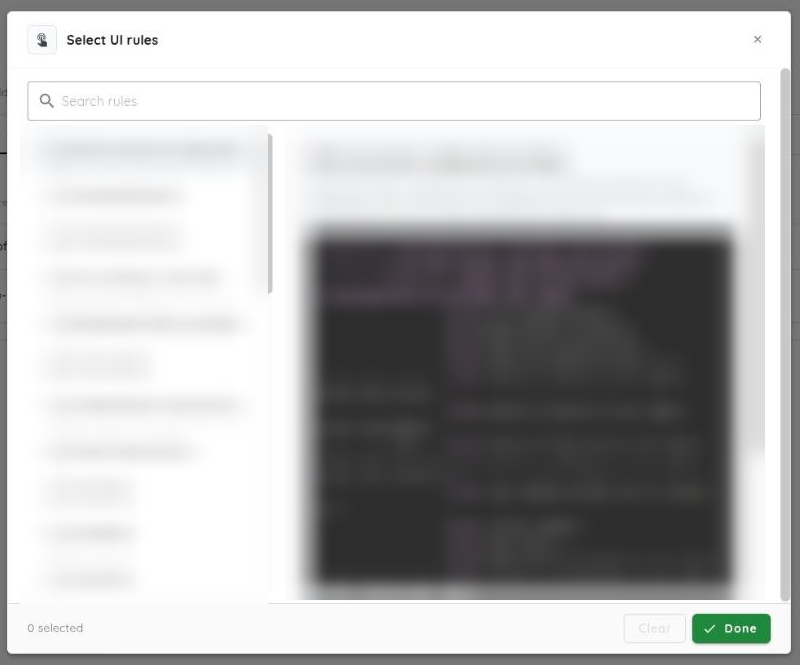
UI Rules and Test Credentials are not available for Fast Scan. They show up once you choose Full Scan or Privacy Scan, and each one opens a picker with a search box. Tick the ones to use and click a name to preview it.
Add the Webhook in Appcircle
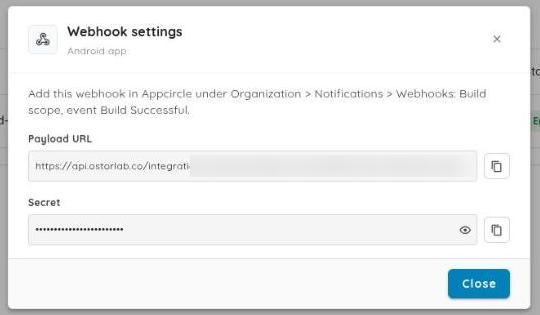
After saving, open the Webhook settings action of the configuration. It shows the Webhook URL and the Secret to paste in Appcircle. The secret is hidden until you click the eye icon.
- In Appcircle, click Organization in the left menu, then Notifications and Webhooks.
- Click Add Webhook.
- Give the webhook a name and keep Enable on.
- Select the Build scope. The list of events appears.
- Turn on Build Successful. Turn on Build Complete with Warnings too if you want those builds scanned.
- Paste the Webhook URL from Ostorlab as the payload URL and the Secret as the secret.
- Save the webhook.
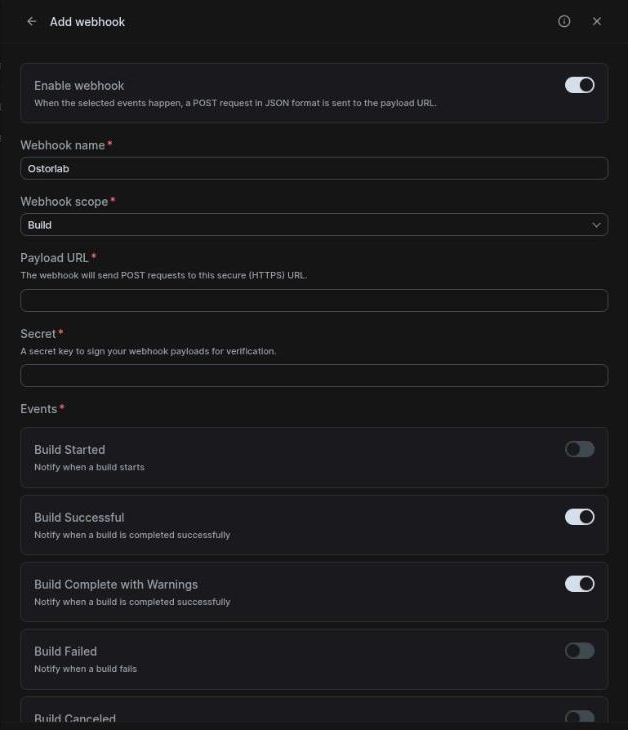
There is no build profile field in the Appcircle webhook: it sends every build of the organization. When the configuration has a build profile, Ostorlab skips the builds of the other profiles.
Ostorlab verifies the ac_signature header of every delivery with the secret and rejects deliveries older than ten minutes, as recommended by Appcircle.
Test the Connection
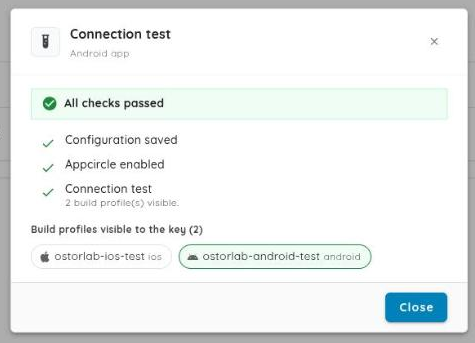
Open the actions menu of a configuration and click Test connection. Ostorlab checks that the configuration is saved and enabled, and that the key can list your build profiles. The dialog shows the result of each check and the build profiles the key can see. The profile used by the configuration is marked.
Run a Build
Start a build in Appcircle. When it succeeds, a scan named after the configuration appears in your scans, with the scan profile, UI rules and test credentials of the configuration.
Follow the Deliveries
The History tab lists what Appcircle sent to each configuration and what Ostorlab did with it, newest first. Pick a configuration at the top, then click a delivery to see its details.
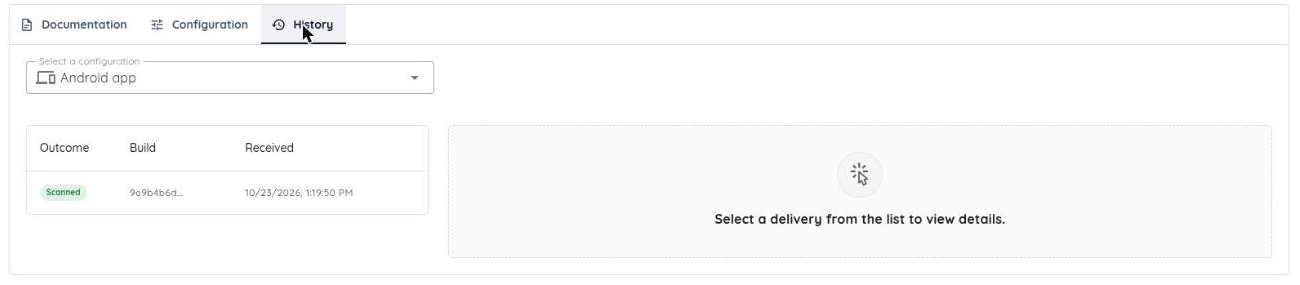
Each delivery has one of these outcomes:
| Outcome | Meaning |
|---|---|
| Scanned | A scan was created. The details link to it. |
| Skipped | Nothing to scan: the event is not a build, the build did not succeed, it belongs to another build profile, or it was already scanned. |
| Rejected | The delivery was not accepted, for example a wrong signature or an old timestamp. |
| Error | Ostorlab could not fetch or scan the build. The details give the reason. |
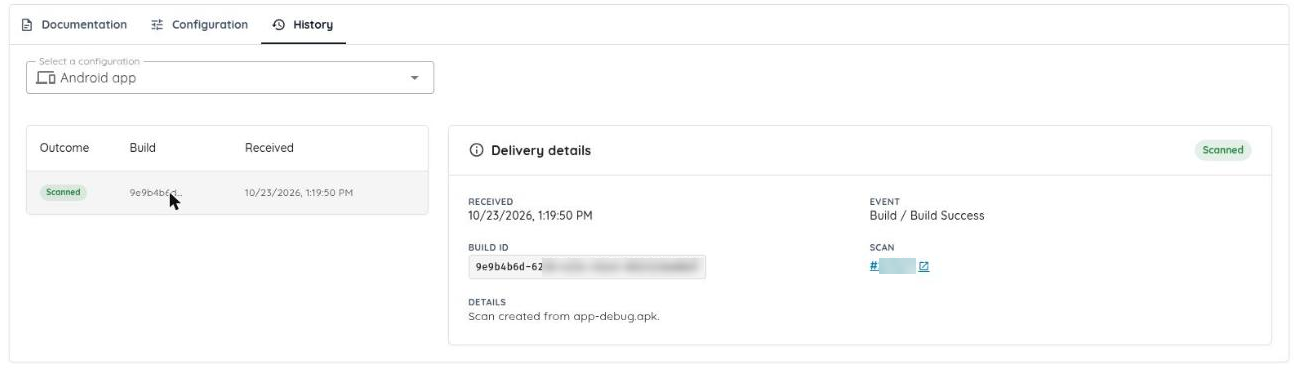
If the build exports both an Android and an iOS application, each one is recorded as its own delivery and gets its own scan. If only one of them failed, a redelivery scans only that one.
Manage a Configuration
The actions menu of a configuration lets you edit it, enable or disable it, see its webhook settings, test the connection and delete it. A disabled configuration keeps its webhook but scans nothing. Deleting a configuration also deletes its delivery history, and the scans it created are kept.

Troubleshooting
| Message | What to check |
|---|---|
| Appcircle rejected the personal access key | The key was revoked or belongs to another organization. Generate a new key and edit the configuration. |
| The build artifacts hold no APK, AAB or IPA file | Add the Export Build Artifacts step to the workflow and export the application. |
| The build produced an Xcode archive but no IPA | The iOS build profile has no signing identity. Add one in Appcircle. |
| Bad or missing ac_signature | The secret in the Appcircle webhook is not the one shown in Ostorlab. Paste it again. |
| A build is not scanned and the history shows nothing | Check the Request History of the webhook in Appcircle, and that the webhook has the Build scope with Build Successful on. |
Run Ostorlab as a Workflow Step
Instead of the webhook, you can run the scan from a Custom Script step in your Appcircle workflow. The step uses the Ostorlab CLI to upload the application and create the scan in your Ostorlab organization. It can also wait for the scan result and fail the build when the risk rating is too high.
Note
Use the webhook or the workflow step for a build profile, not both. Otherwise every build is scanned twice.
Before You Start
- An Ostorlab API key. In Ostorlab, open Integrations/API → API Keys, click New API Key and copy the key. See API key authentication.
- A build runner with Python 3.13 or later. The Appcircle cloud runners have it.
- For self-hosted runners, outbound access to
api.ostorlab.coand topypi.org, to install the Ostorlab CLI.
Store the API Key as a Secret
- In Appcircle, open Build → Environment variables and click Add variable group. Name it, for example
OSTORLAB. -
Select Secret, enter
OSTORLAB_API_KEYas the key and your Ostorlab API key as the value, then click Add.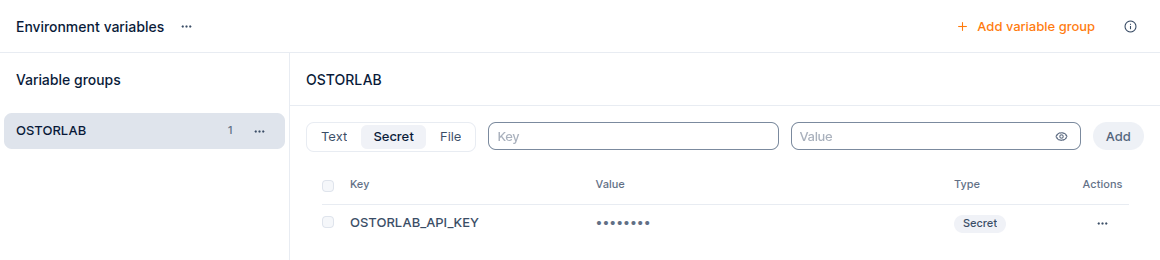
-
Open your build profile, click Configurations and open the configuration. In the Environment tab, select the
OSTORLABgroup and click Save.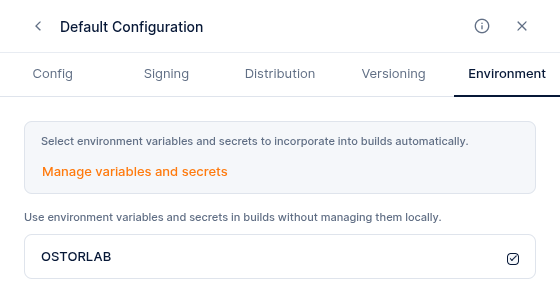
Add the Step to the Workflow
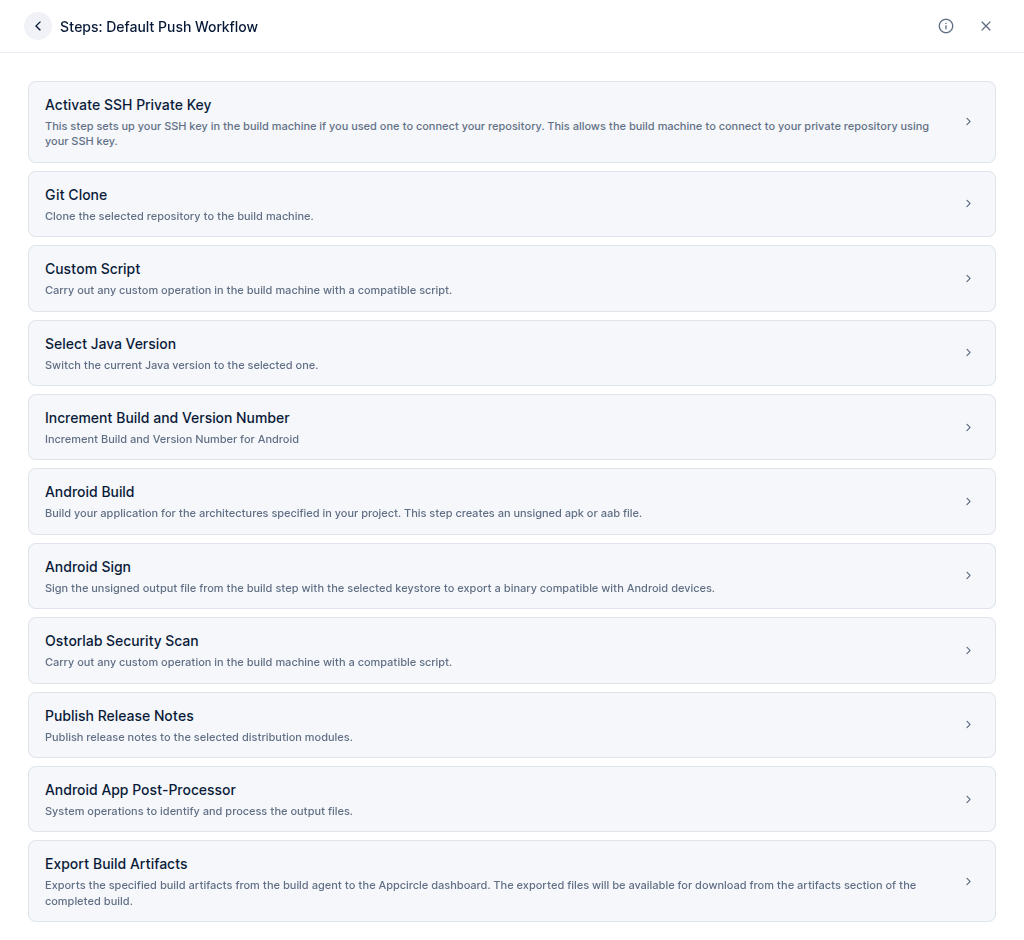
- In your build profile, click Workflows, open the workflow and click Manage workflow.
-
Drag the Custom Script step from the available steps to just after the step that signs the application, for example Android Sign, and click Save.
-
Open the step and rename it, for example
Ostorlab Security Scan. Keep Execute with onbashand paste the script below in Script to execute. Click Save.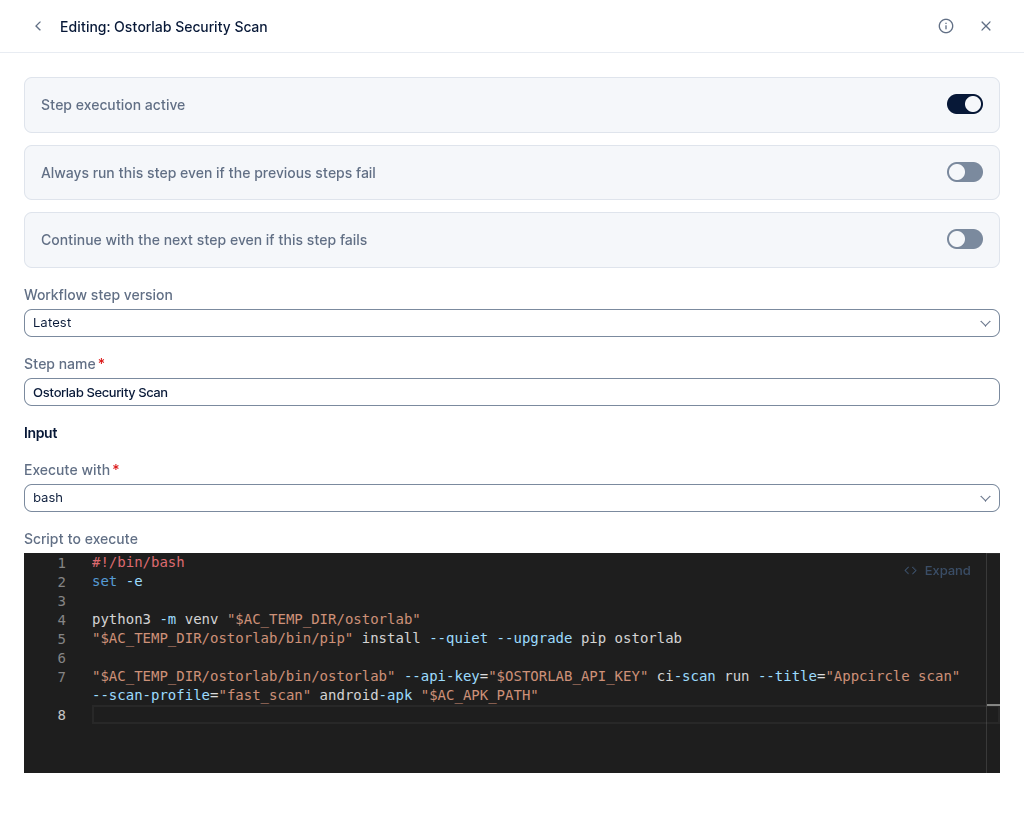
#!/bin/bash
set -e

python3 -m venv "$AC_TEMP_DIR/ostorlab"
"$AC_TEMP_DIR/ostorlab/bin/pip" install --quiet --upgrade pip ostorlab

"$AC_TEMP_DIR/ostorlab/bin/ostorlab" --api-key="$OSTORLAB_API_KEY" ci-scan run \
  --title="Appcircle scan" \
  --scan-profile="fast_scan" \
  android-apk "$AC_APK_PATH"
The script installs the Ostorlab CLI in a virtual environment in the Appcircle temporary folder, then creates the scan. AC_APK_PATH is the APK produced by the build.
To scan another kind of application, change the last line:
| Application | Last line |
|---|---|
| Android APK | android-apk "$AC_APK_PATH" |
| Android App Bundle | android-aab "$AC_AAB_PATH" |
| iOS | ios-ipa <path to the IPA> |
Script Options
Add these options to the ci-scan run command:
--scan-profile:fast_scan(static analysis only) orfull_scan(static, dynamic and backend analysis).--title: the scan title shown in Ostorlab.--break-on-risk-rating: wait for the scan to finish and fail the step if the risk rating is higher than this value. For example,highfails the build only on acriticalrisk rating. Without it, the step does not wait for the result.--max-wait-minutes: how long to wait for the result when--break-on-risk-ratingis set (default: 30). The step fails if the scan does not finish in time.--test-credentials-loginand--test-credentials-password: credentials the Full Scan uses to log in to the application.--ui-prompt-nameand--ui-prompt-action: natural language instructions that tell the scanner how to navigate the application.
The full list of options is in the Bitrise guide, which uses the same command.
Run a Build
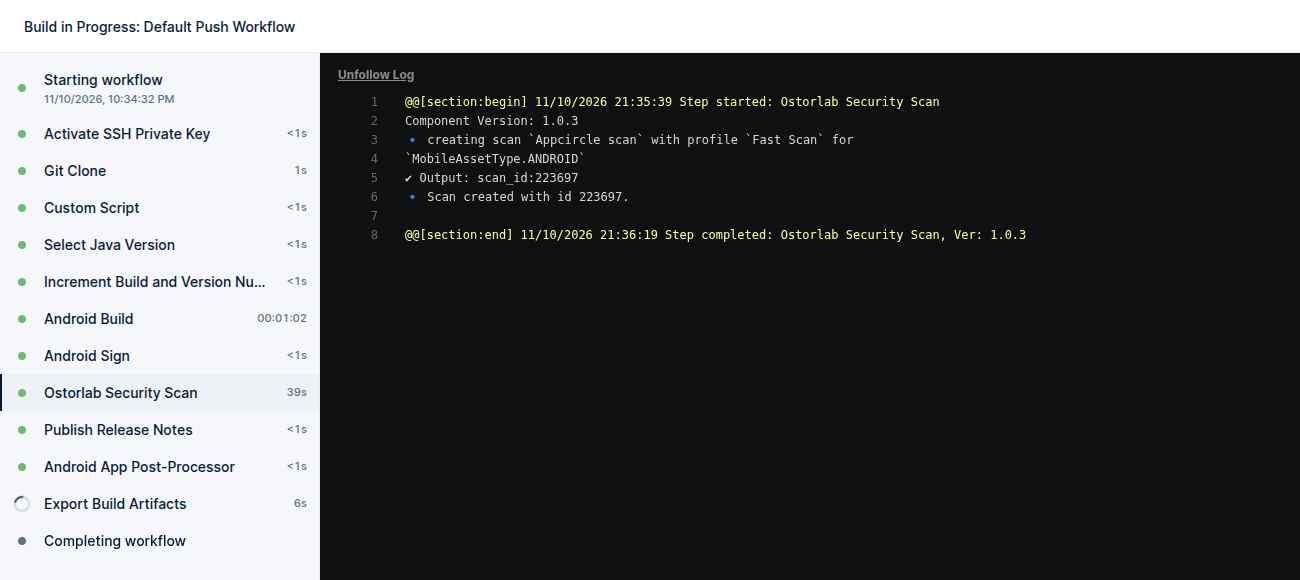
Start a build. The step log shows the ID of the scan it created, and the scan appears in your Ostorlab scans.
| Message | What to check |
|---|---|
| The app is not included in ... subscription | Your Ostorlab subscription does not cover this application or scan profile. Contact your Ostorlab account manager. |
Requires-Python or no matching distribution for ostorlab |
The runner's python3 is older than 3.13. Install a newer Python on the runner or call it by its full path. |
Next Steps
Run your next build in Appcircle, then open the scan list in Ostorlab to check that the scan used the scan profile, UI rules and test credentials of the configuration.
- See Scan profiles to choose the right profile for a build.
- See the App Center guide for the same kind of integration with Microsoft App Center.