API
Info
OstorlabはUniversal Binary JSONエンコーディングのサポートを追加しました。UBJSONは複数のパフォーマンス上の利点を提供し、 バイナリデータタイプのサポートを追加します。フォーマットと利用可能なライブラリに関する詳細情報については、以下の リンク UBJSON Spec をご確認ください。 JSONのサポートも引き続き利用可能であり、content typeヘッダーを使用してどちらかを指定できます。
本ガイドでは、Ostorlab APIを使用するための手順について説明します。APIを使用することで、スキャンの作成やスキャンの進行状況へのアクセスから、脆弱性のリストアップまで、あらゆる種類のタスクを実行できます。次のセクションでは、APIの使用方法、およびその実験とテスト方法について説明します。
アクセス
APIにアクセスするには複数の方法があります。GraphiQL Webアプリケーションを使用してAPIを実験するか、スクリプトを利用できます。スクリプトの一般的な用途は、デプロイメントパイプラインでの自動化、または大量のスキャンの作成と監視の自動化です。
1. サンドボックス (Sandbox)
GraphiQLは以下のURLからアクセス可能です:https://api.ostorlab.co/apis/graphql
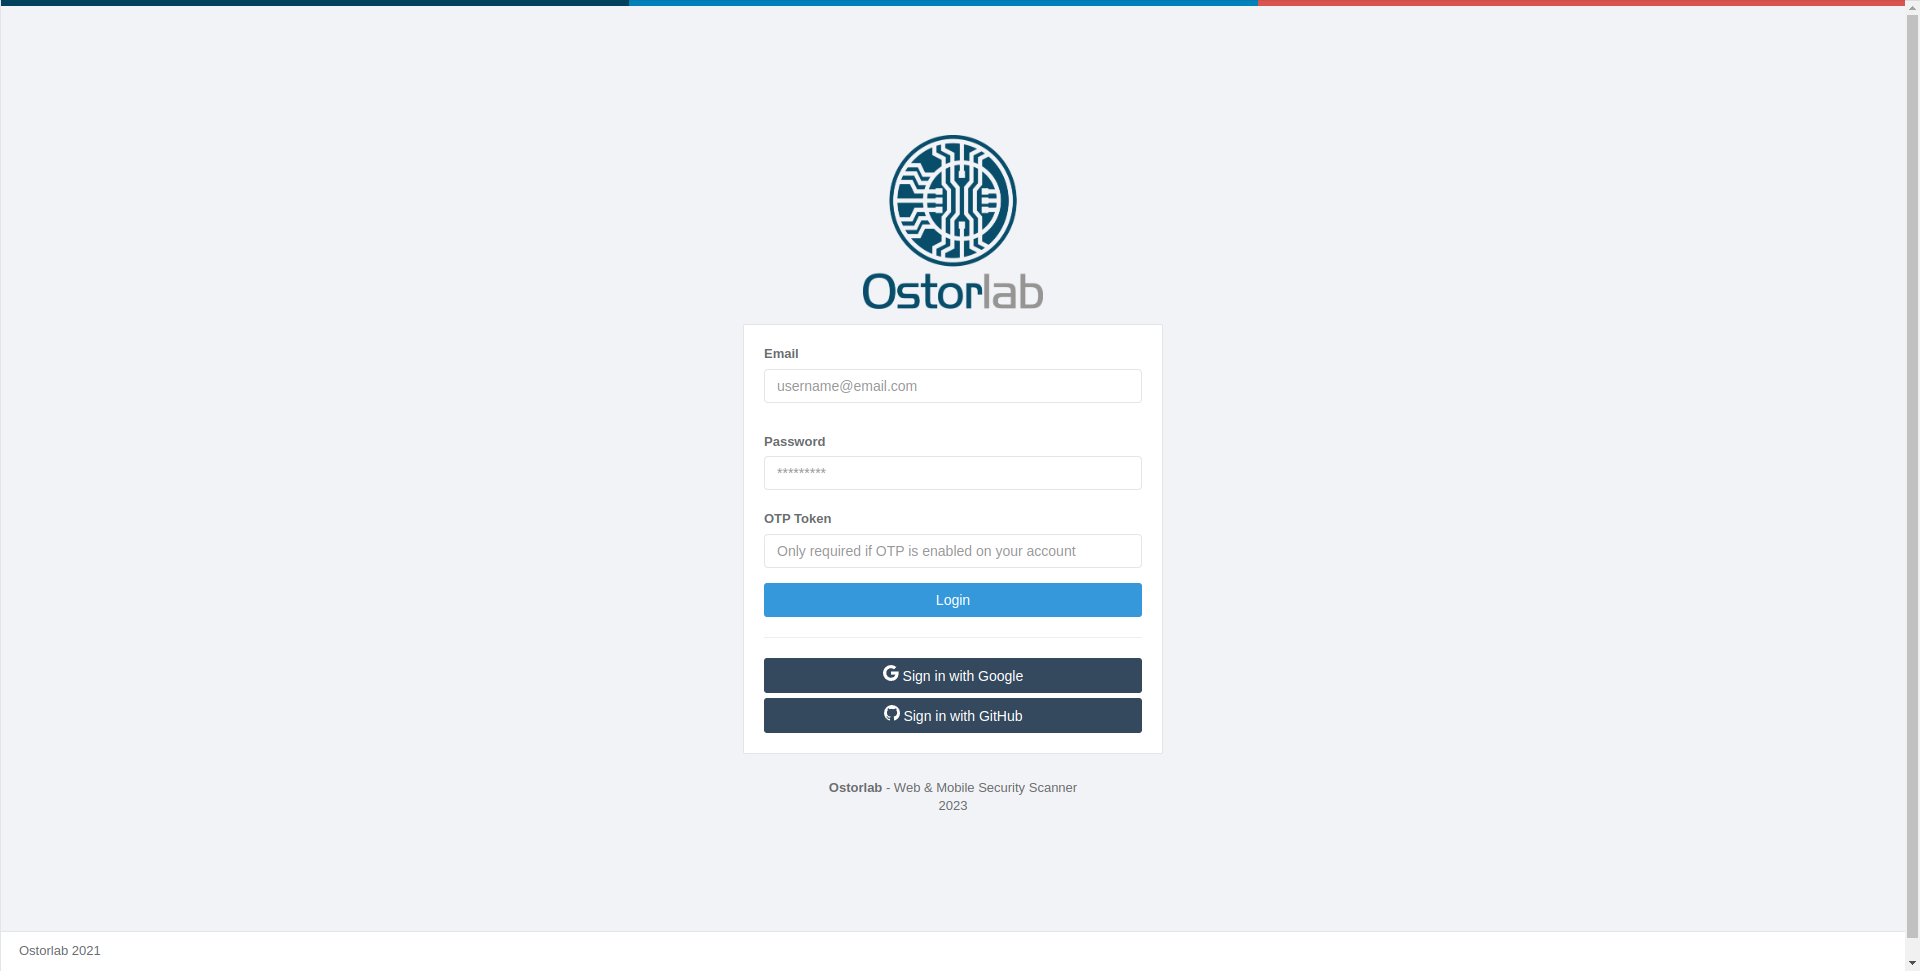
APIは認証されたユーザーのみアクセス可能です。https://api.ostorlab.co/portal/loginで認証されていることを確認してください。
例
APIの使用方法を理解していただくために、一般的なクエリの例をいくつか示します:
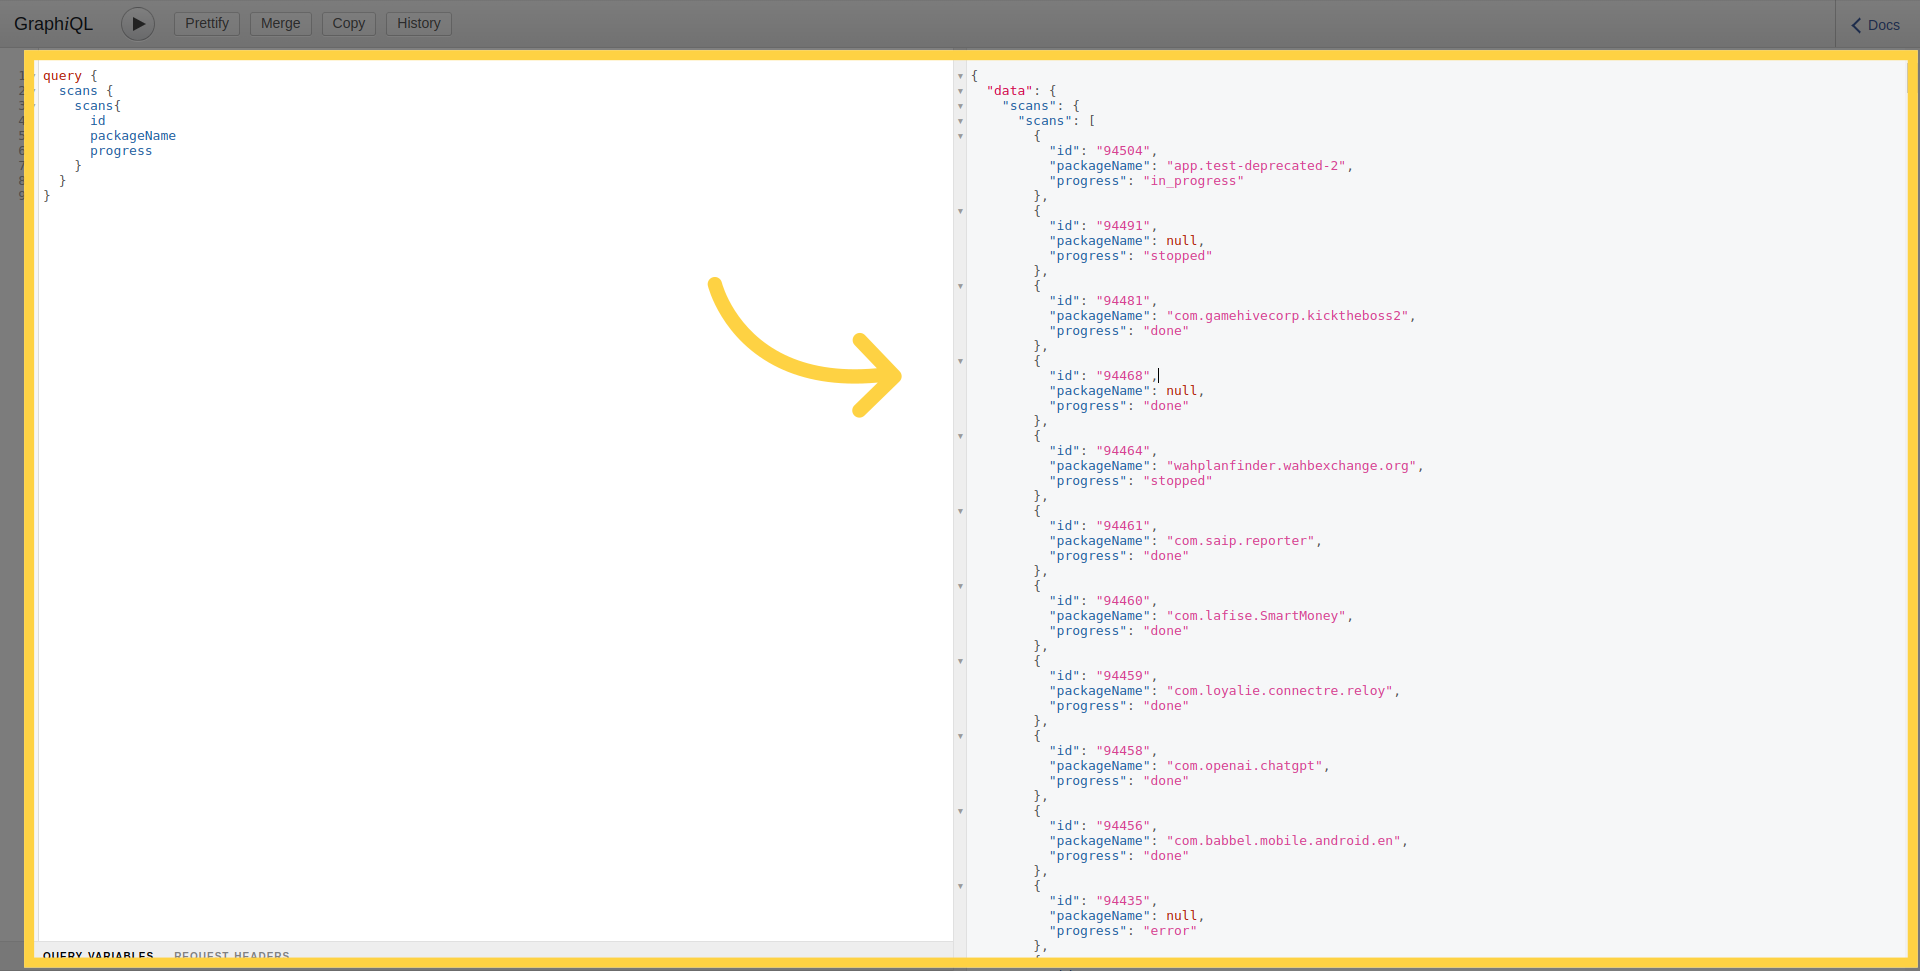
スキャンのリスト化
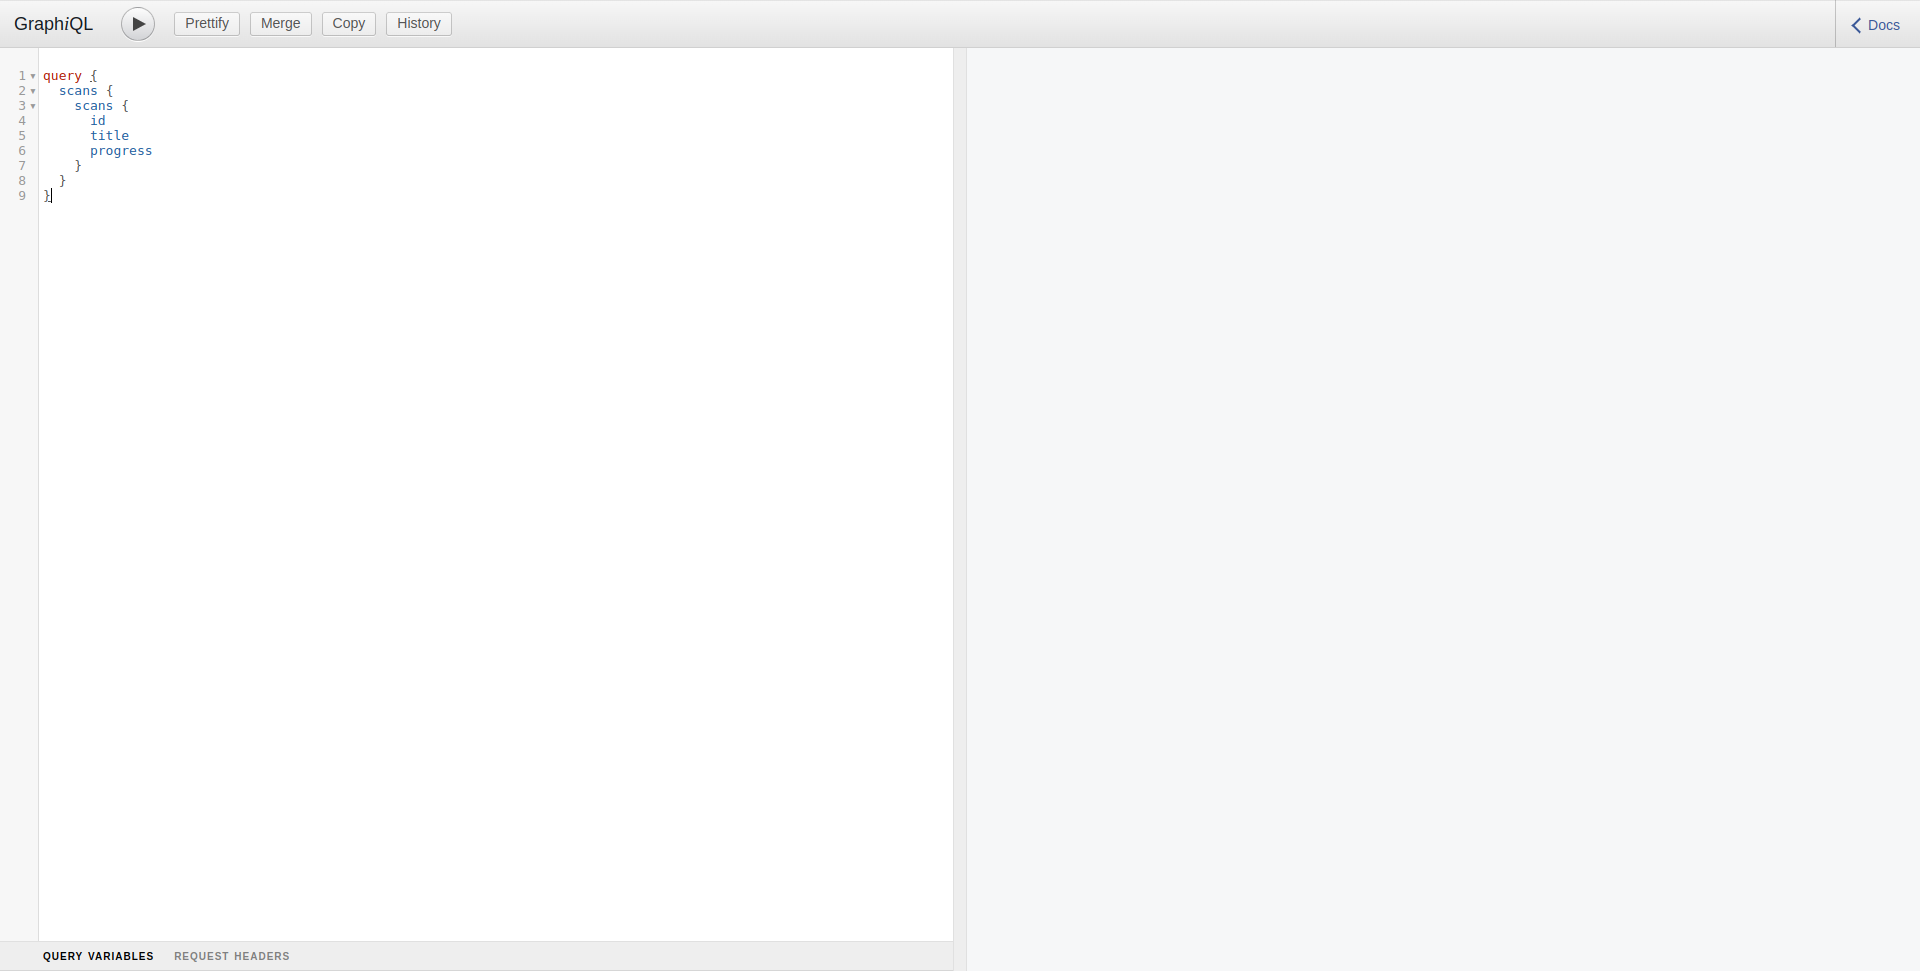
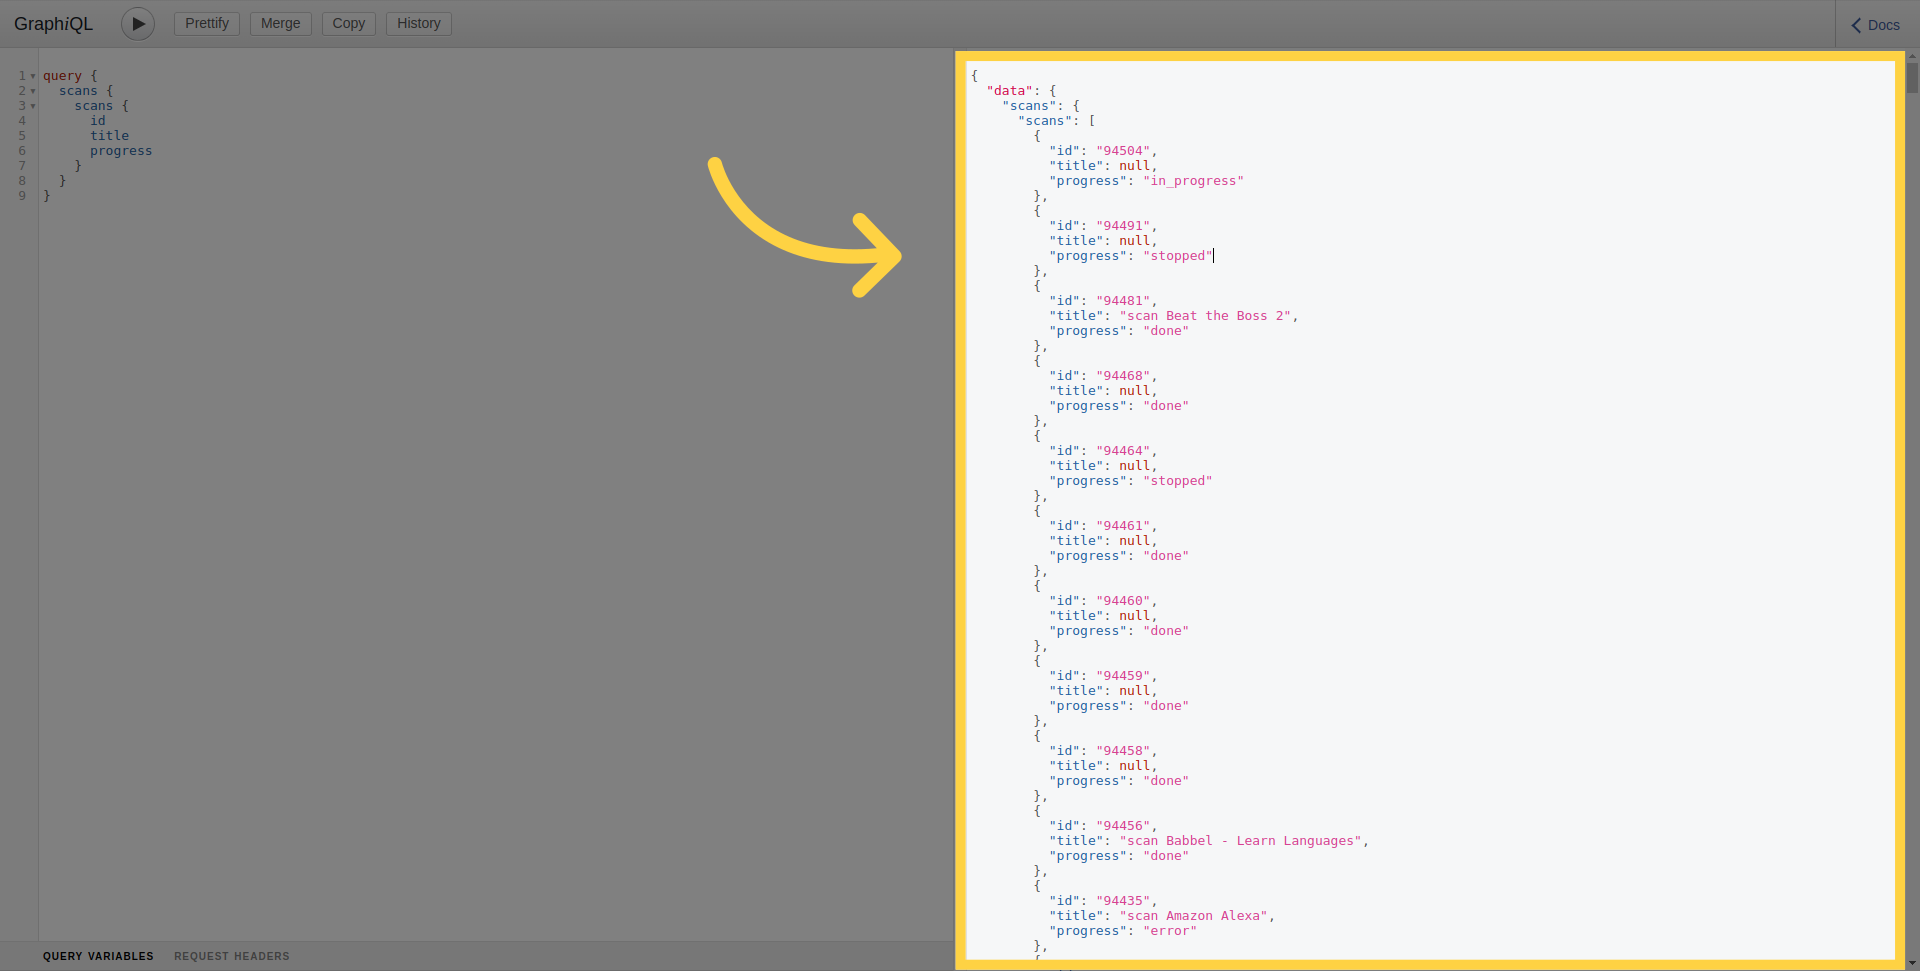
現在のユーザーの組織が所有するすべてのスキャンをリストアップするには:
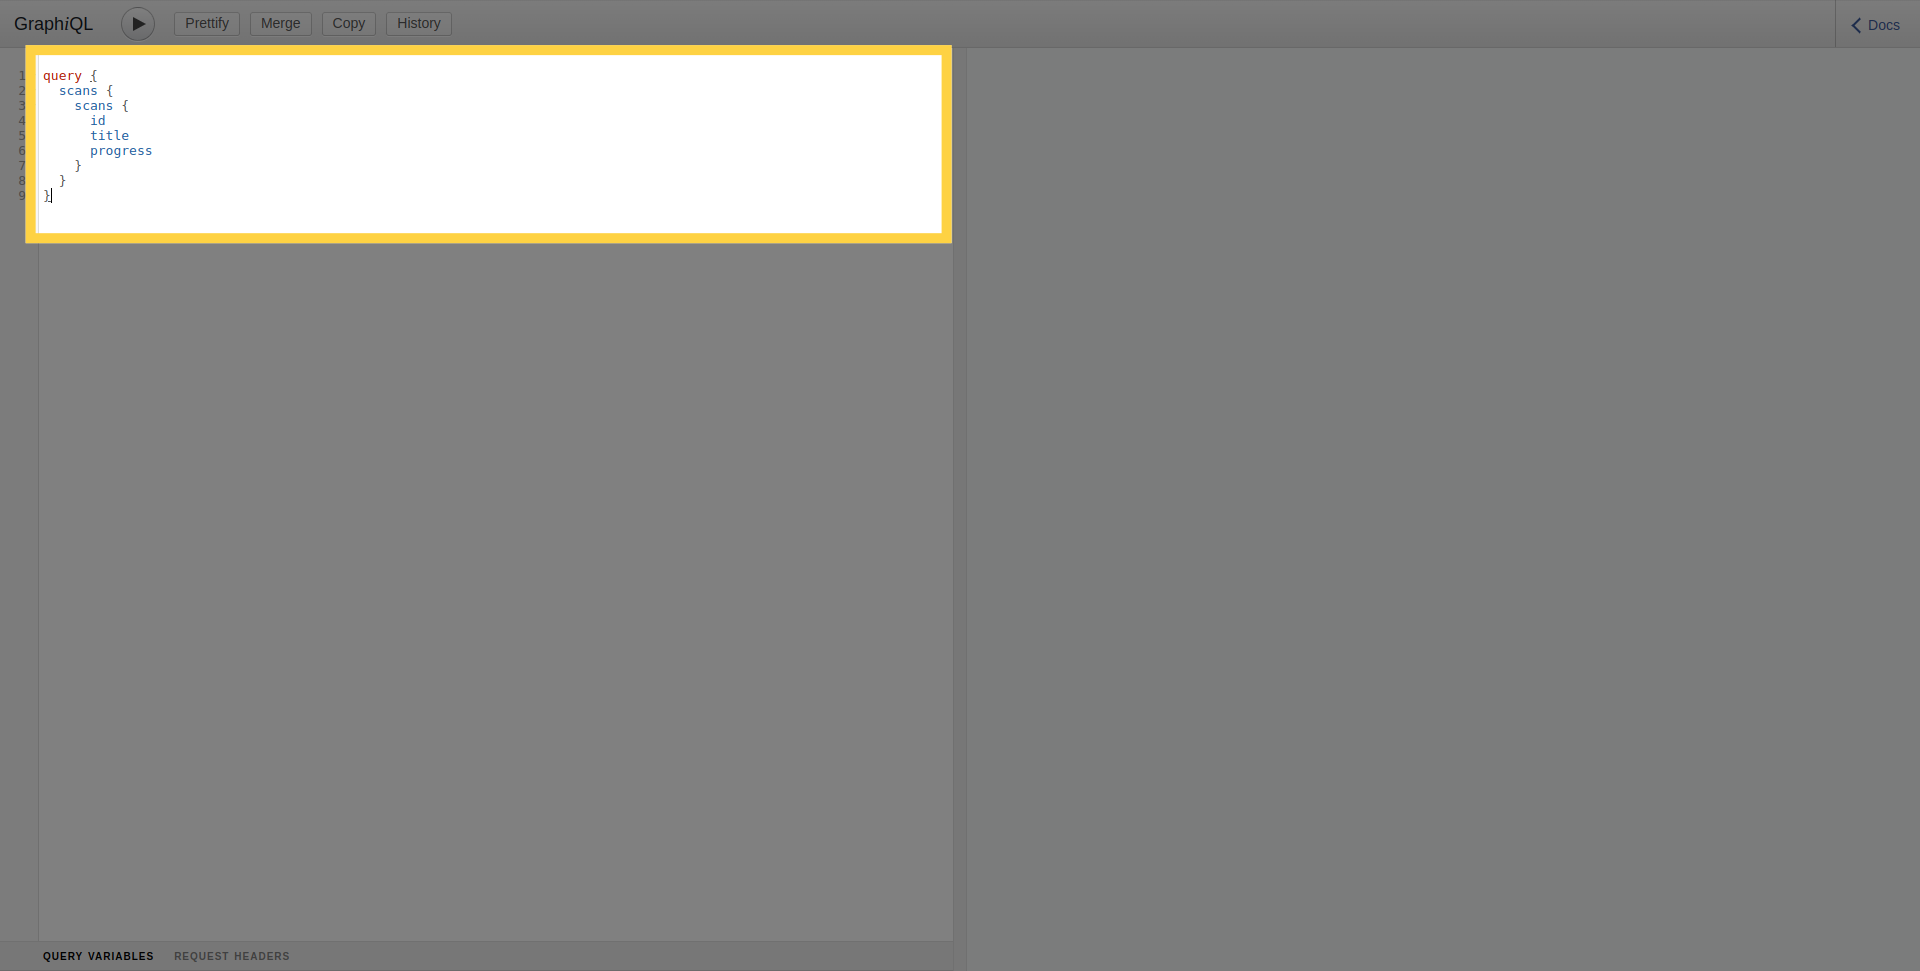 クエリを実行するには、実行ボタンをクリックしてください。
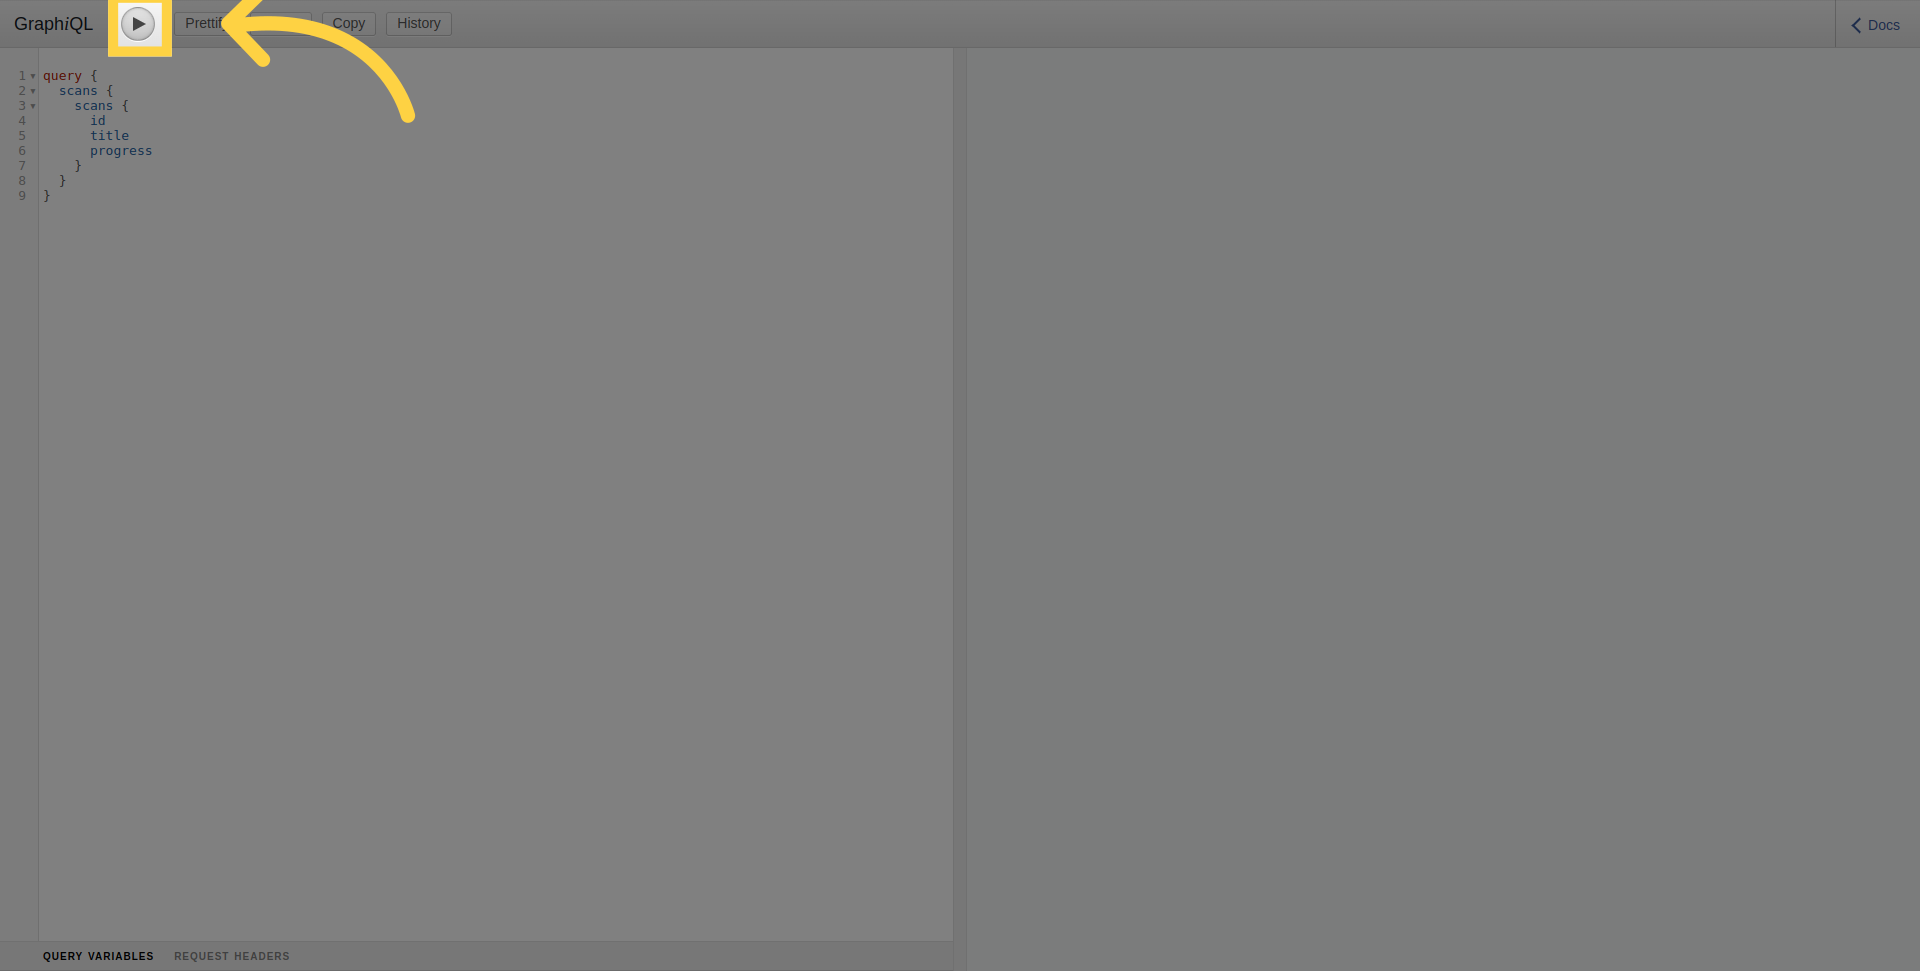
右側のセクションで、実行されたクエリの結果を確認できます。
フィルターによるスキャンのリスト化
特定のモバイルアプリケーションのスキャンをリストアップするには、target引数を使用してアプリケーションのパッケージ名またはバンドルIDを指定します。
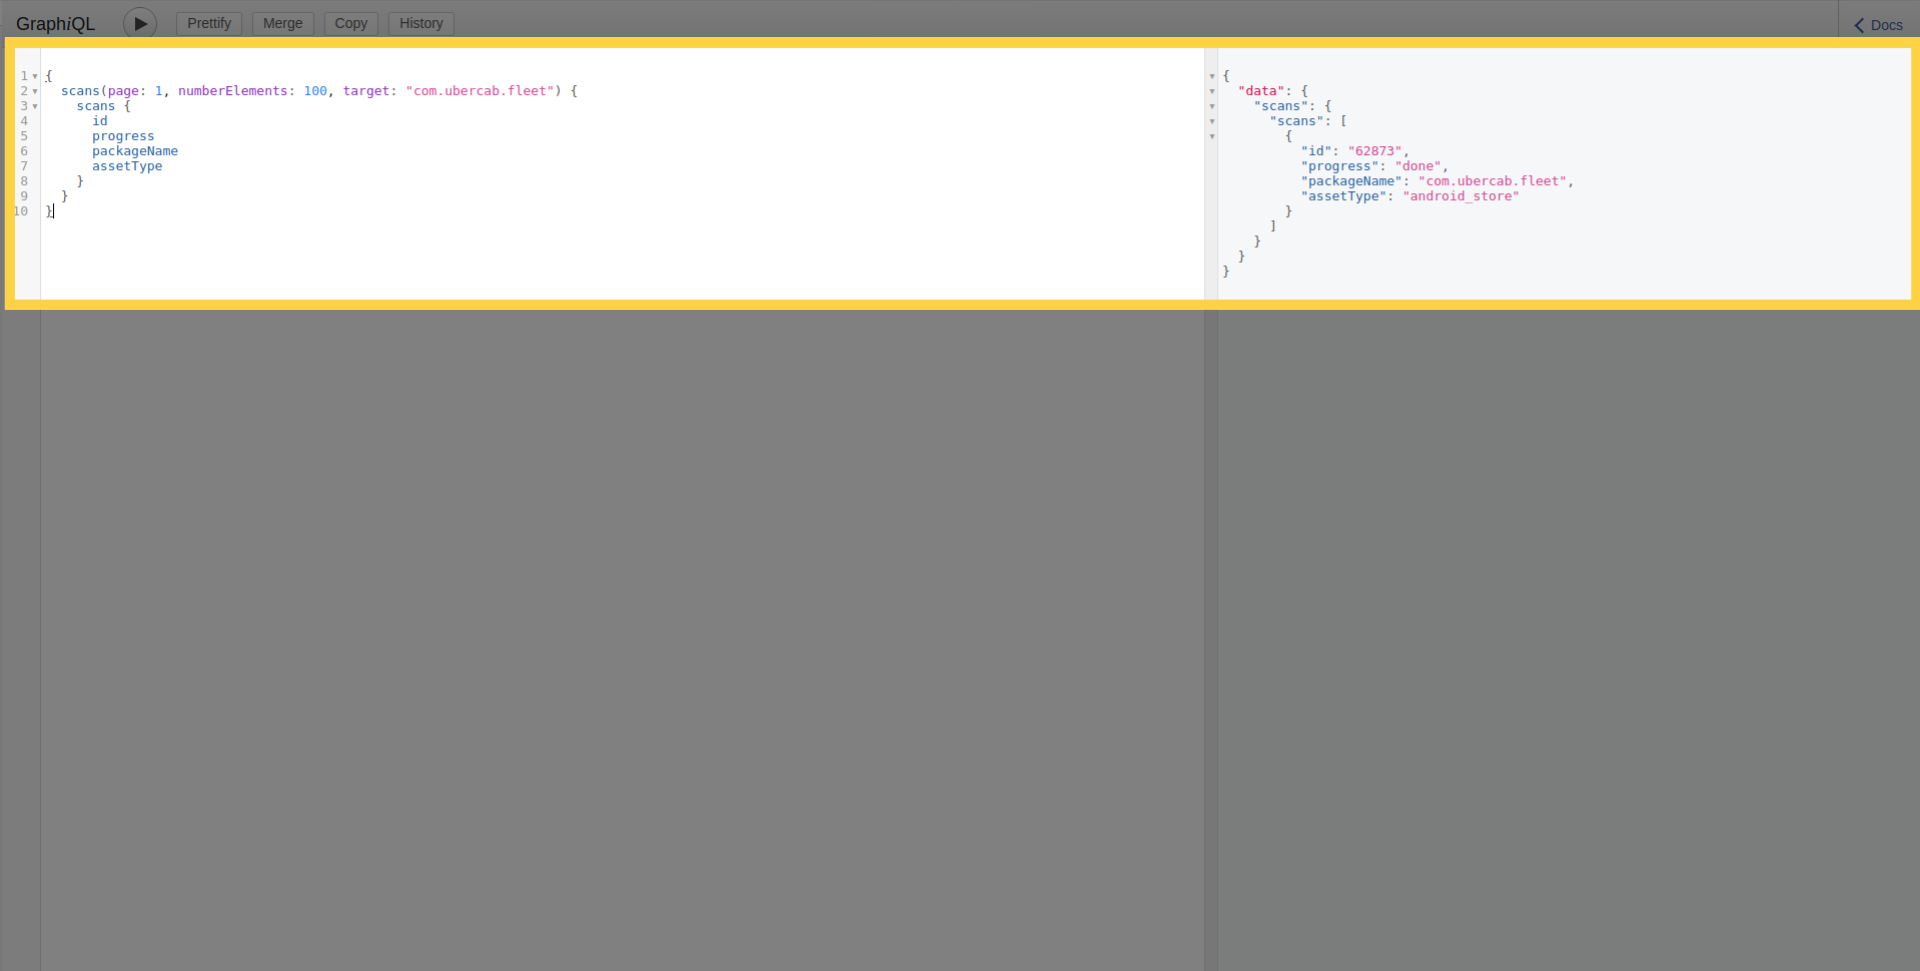
スキャンAPIは、targetAssetTypes、riskRatings、progressなどの他のフィルターをサポートしており、orderByおよびsort引数を使用して並べ替えやソートが可能です。
スキャンの詳細
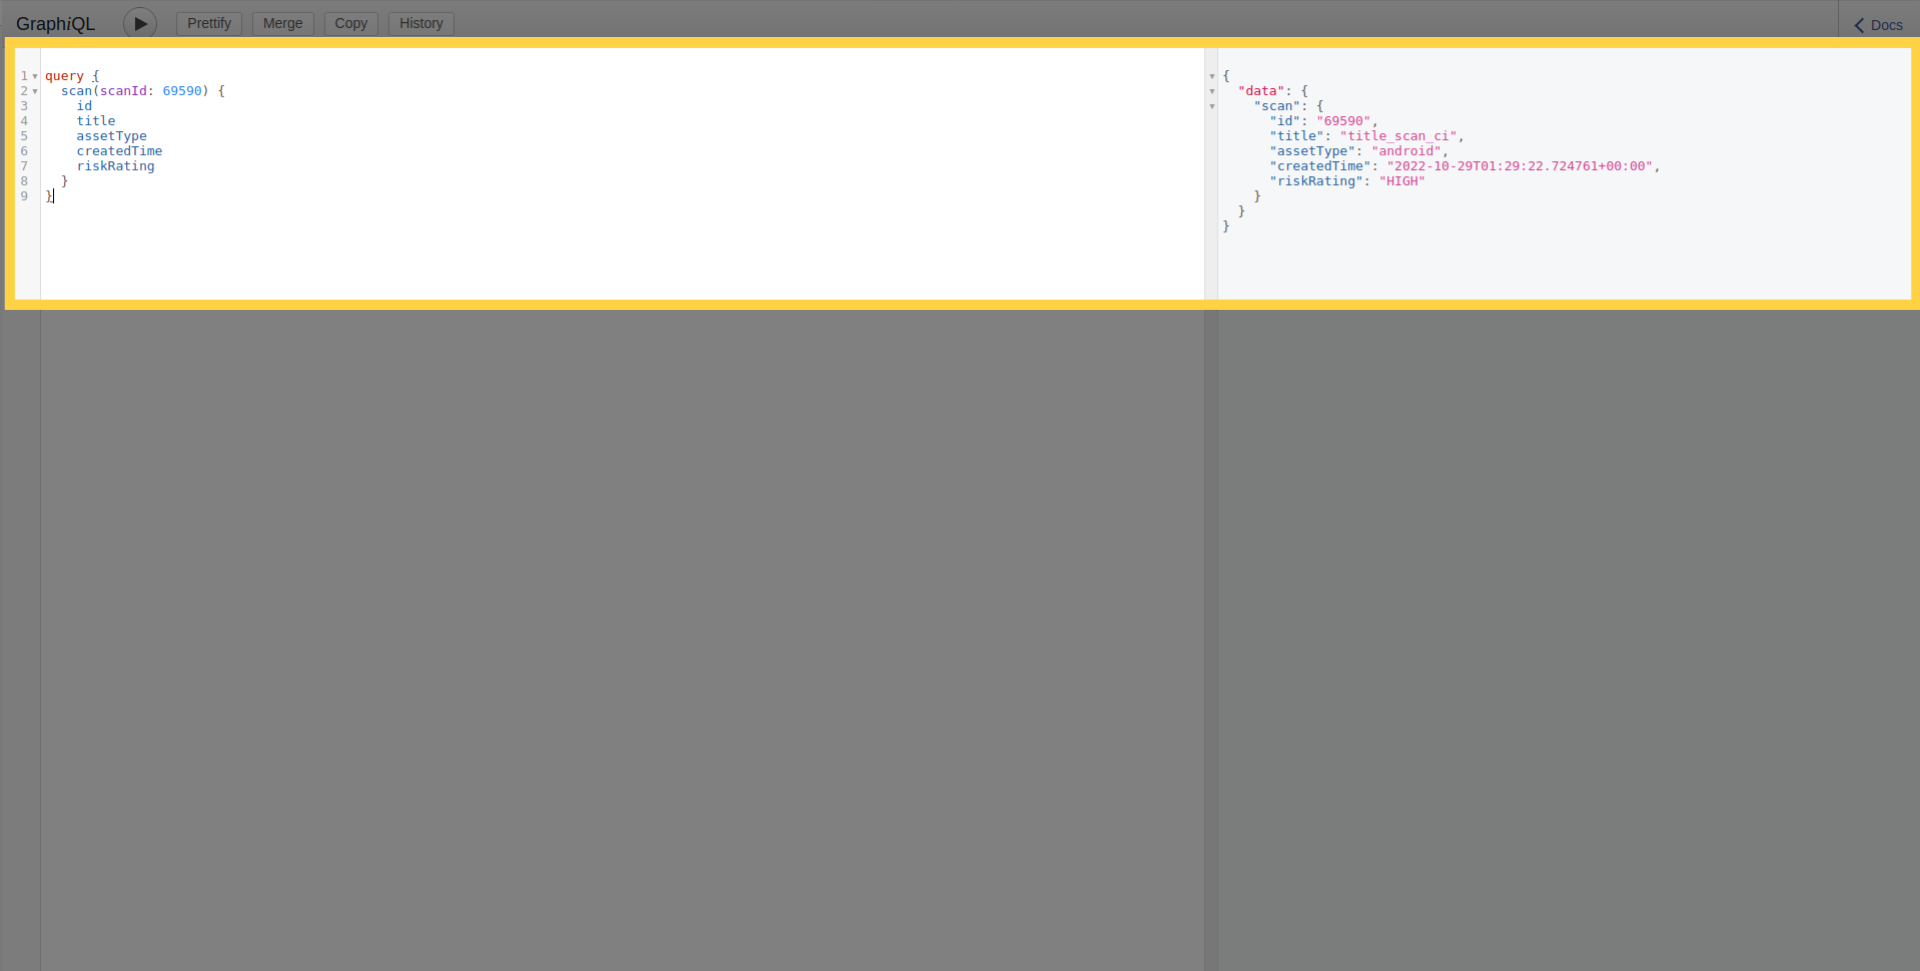
また、以下のようにIDを使用して単一のスキャンの詳細を取得することもできます:
脆弱性の詳細
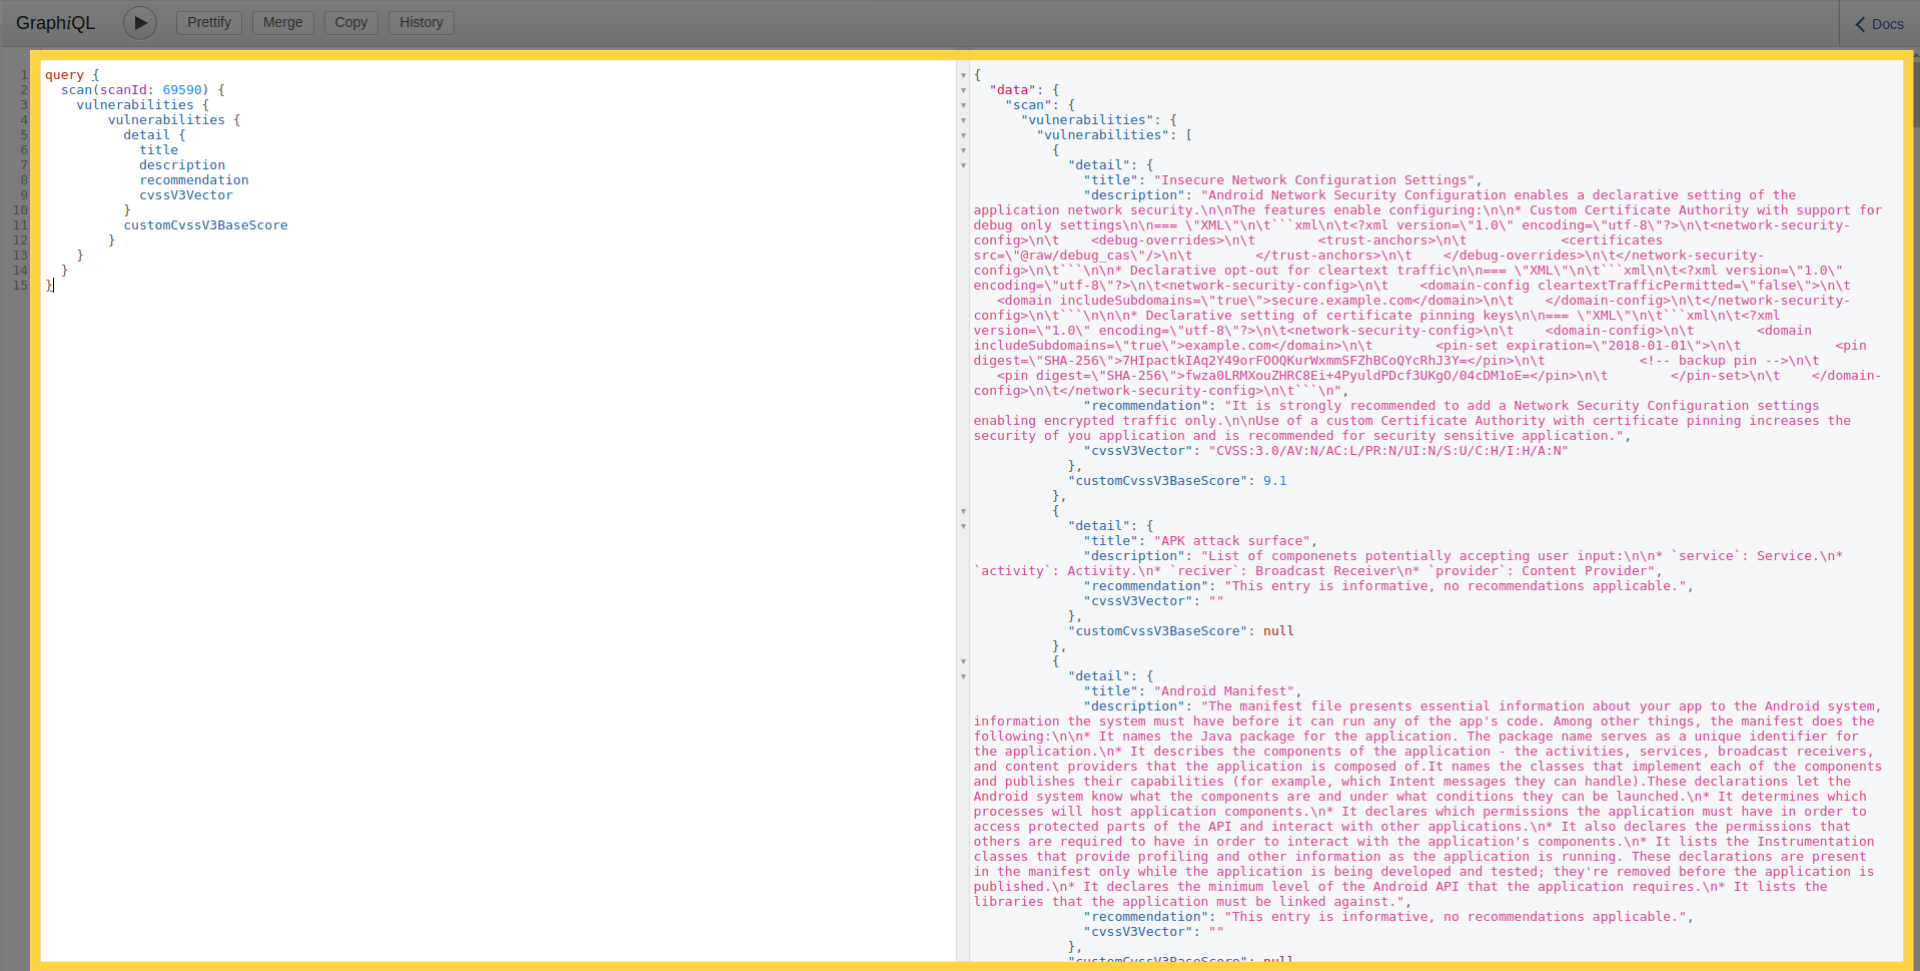
さらに、このクエリを使用すると、スキャンの脆弱性のリストとその詳細を取得できます:
スキャンの進行状況
それに加えて、スキャンの現在の進行段階を確認するには、以下のクエリを使用できます:
新規スキャンの作成
スキャンを作成するには、ファイルをマルチパートHTTPリクエストとしてアップロードします。
mutation newMobileScan($title: String!, $assetType: String!, $application: Upload!, $scanProfile: String!) {
      createMobileScan(title: $title, assetType:$assetType, application: $application, scanProfile: $scanProfile) {
        scan {
            id
        }
      }
    }
認証付きで新規スキャンを作成する
認証情報を使用してスキャンを作成するには、2つのステップが必要です。まず、認証情報が認証情報ストアに追加され、認証情報IDが返されます。次に、そのスキャンで使用する認証情報のIDを指定して、スキャン作成リクエストが送信されます。
例えば、シンプルなログインとパスワードの認証情報を作成するには、以下を使用できます:
mutation newTestCredential {
  createTestCredentials(testCredentials: {loginPassword: {login: "login1", password: "password1"}}) {
    testCredentials {
      __typename
      ... on LoginPasswordTestCredentials {
        id
      }
    }
  }
}
これにより、以下のようにIDが返されます:
{
  "data": {
    "createTestCredentials": {
      "testCredentials": {
        "__typename": "LoginPasswordTestCredentials",
        "id": "901"
      }
    }
  }
}
認証情報IDを渡すには、IDのリストを含むcredentialIds引数を追加する必要があります:
mutation newMobileScan($title: String!, $assetType: String!, $application: Upload!, $scanProfile: String!) {
  createMobileScan(title: $title, assetType: $assetType, application: $application, scanProfile: $scanProfile, credentialIds: [901]) {
    scan {
      id
    }
  }
}
発見されたアセット
以下のクエリを使用して、発見されたアセット(ドメイン、モバイルアプリケーション、IPなど)のリストを取得できます。これにより、アタックサーフェスディスカバリプラットフォームによって識別されたアセットを探索することができます。このクエリは、アセットのタイプ、所有権、および関連ノードの深さなどのフィルターをサポートしています。
query NodesEdges($depth: Int, $limit: Int, $filterExcluded: Boolean, $assets: [NGAssetIdInputType], $ownerIds: [Int], $nodeKeys: [String], $nodeTypes: [String]) {
  nodesEdges(
    depth: $depth
    limit: $limit
    filterExcluded: $filterExcluded
    assets: $assets
    ownerIds: $ownerIds
    nodeKeys: $nodeKeys
    nodeTypes: $nodeTypes
  ) {
    nodes {
      type
      assetType
      assetId
      key
      ownershipType
      customColor
      attributes {
        name
        value
      }
    }
    edges {
      fromType
      fromKey
      toType
      toKey
      attributes {
        name
        value
      }
    }
  }
}
変数の例:
{
  "depth": 1,
  "limit": 10,
  "ownerIds": [],
  "nodeKeys": [],
  "nodeTypes": [
    "androidApp"
  ]
}
2. スクリプト
前述の通り、APIにアクセスする方法はGraphiQLだけではありません。スクリプトを介して使用することもできます。その一般的な用途は、デプロイメントパイプライン周辺の自動化、または大量のスキャンの作成と監視の自動化です。認証プロセスには、トークンベースの認証とAPI Key認証の2つのオプションがあります。
トークンベースの認証
トークンは、ユーザー名とパスワードを送信することで、以下のURL https://api.ostorlab.co/apis/token から取得できます。ユーザーにリンクされたトークンが作成されます。その後、このトークンはAuthorizationヘッダーに Token {value} の値として設定され、それ以降の https://api.ostorlab.co/apis/graphql_token へのリクエストを認証します。
API Key認証
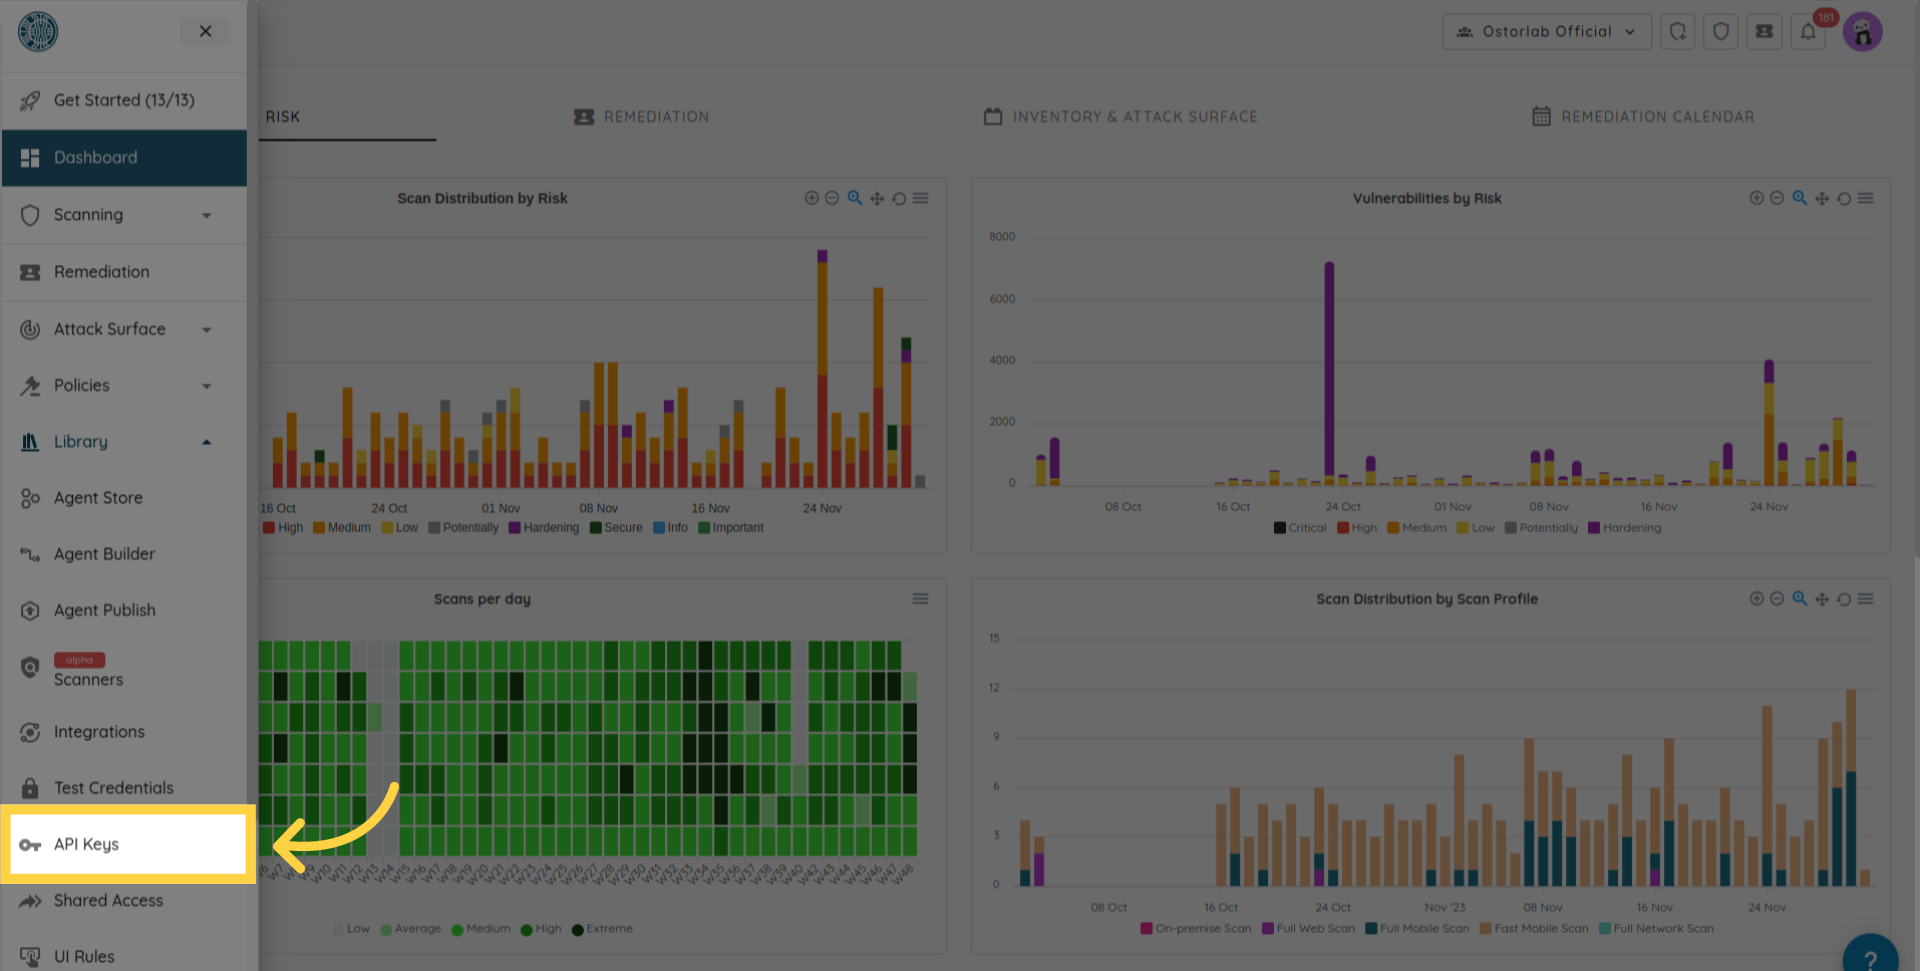
API Keyは、ダッシュボード https://report.ostorlab.co から取得できます。Integrations/APIをクリックする必要があります:

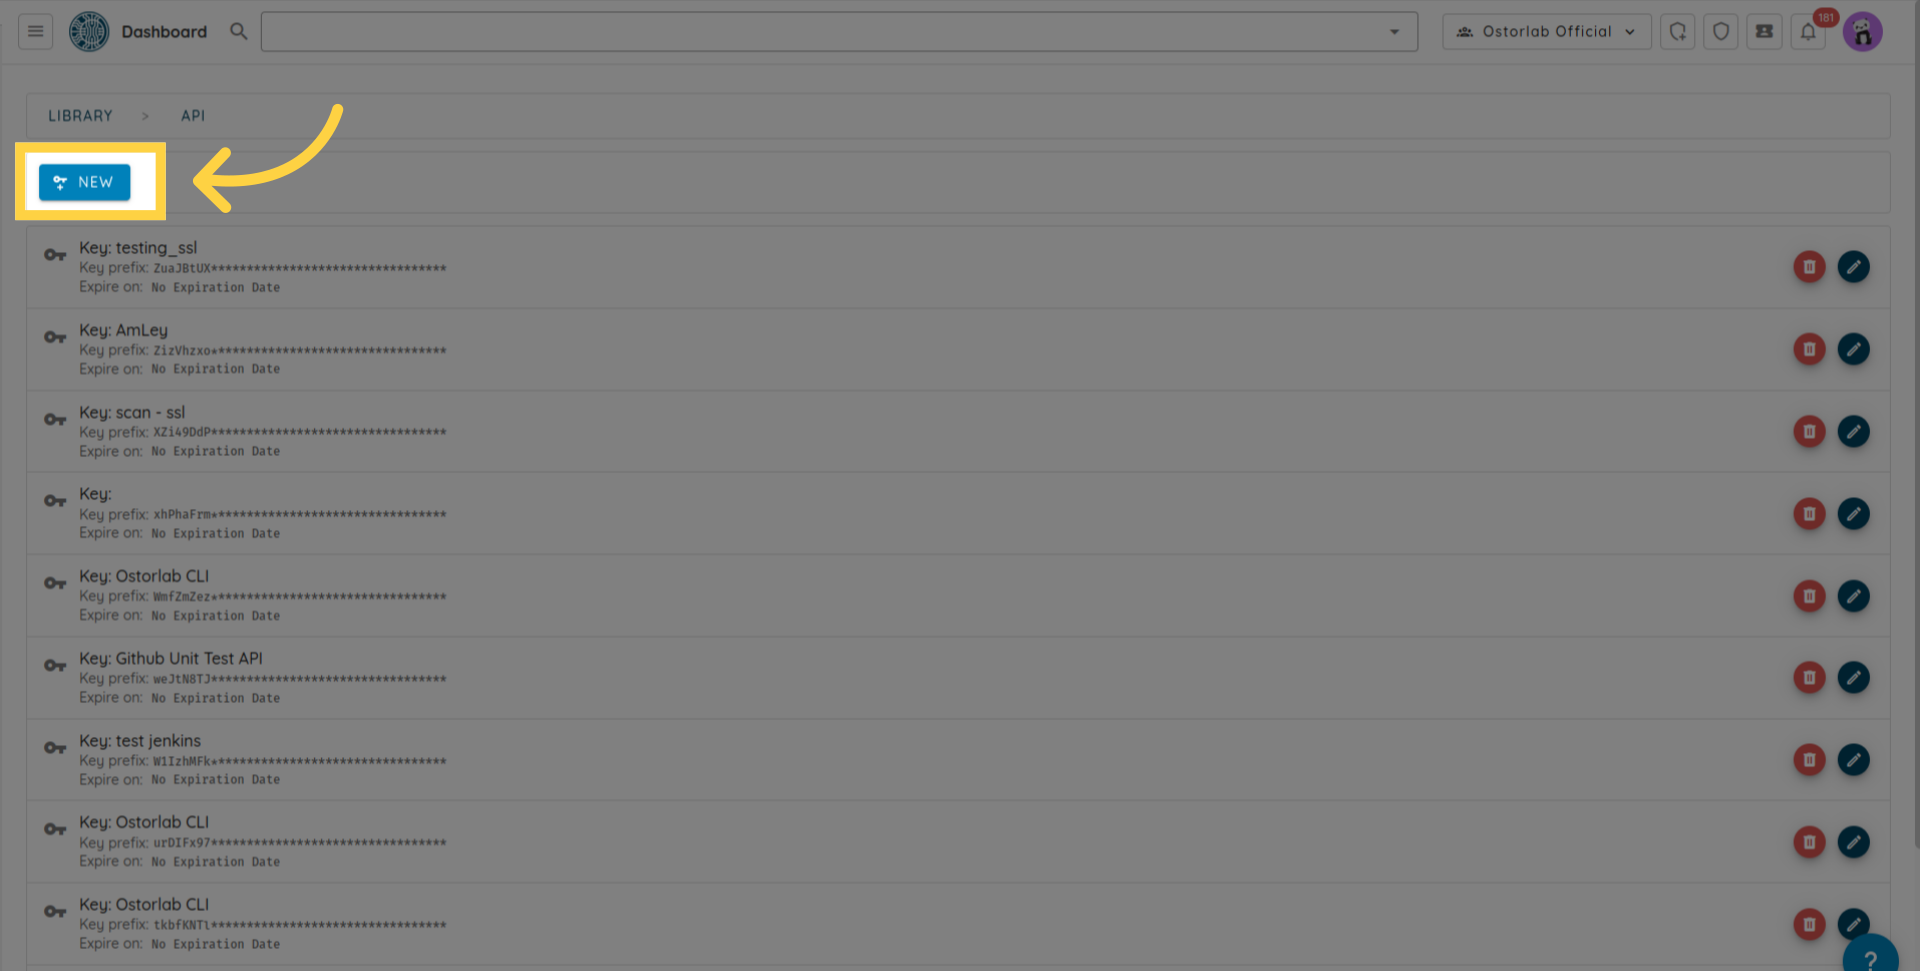
次にAPI keysメニューを開きます。
Newボタンをクリックして新しいキーを生成します
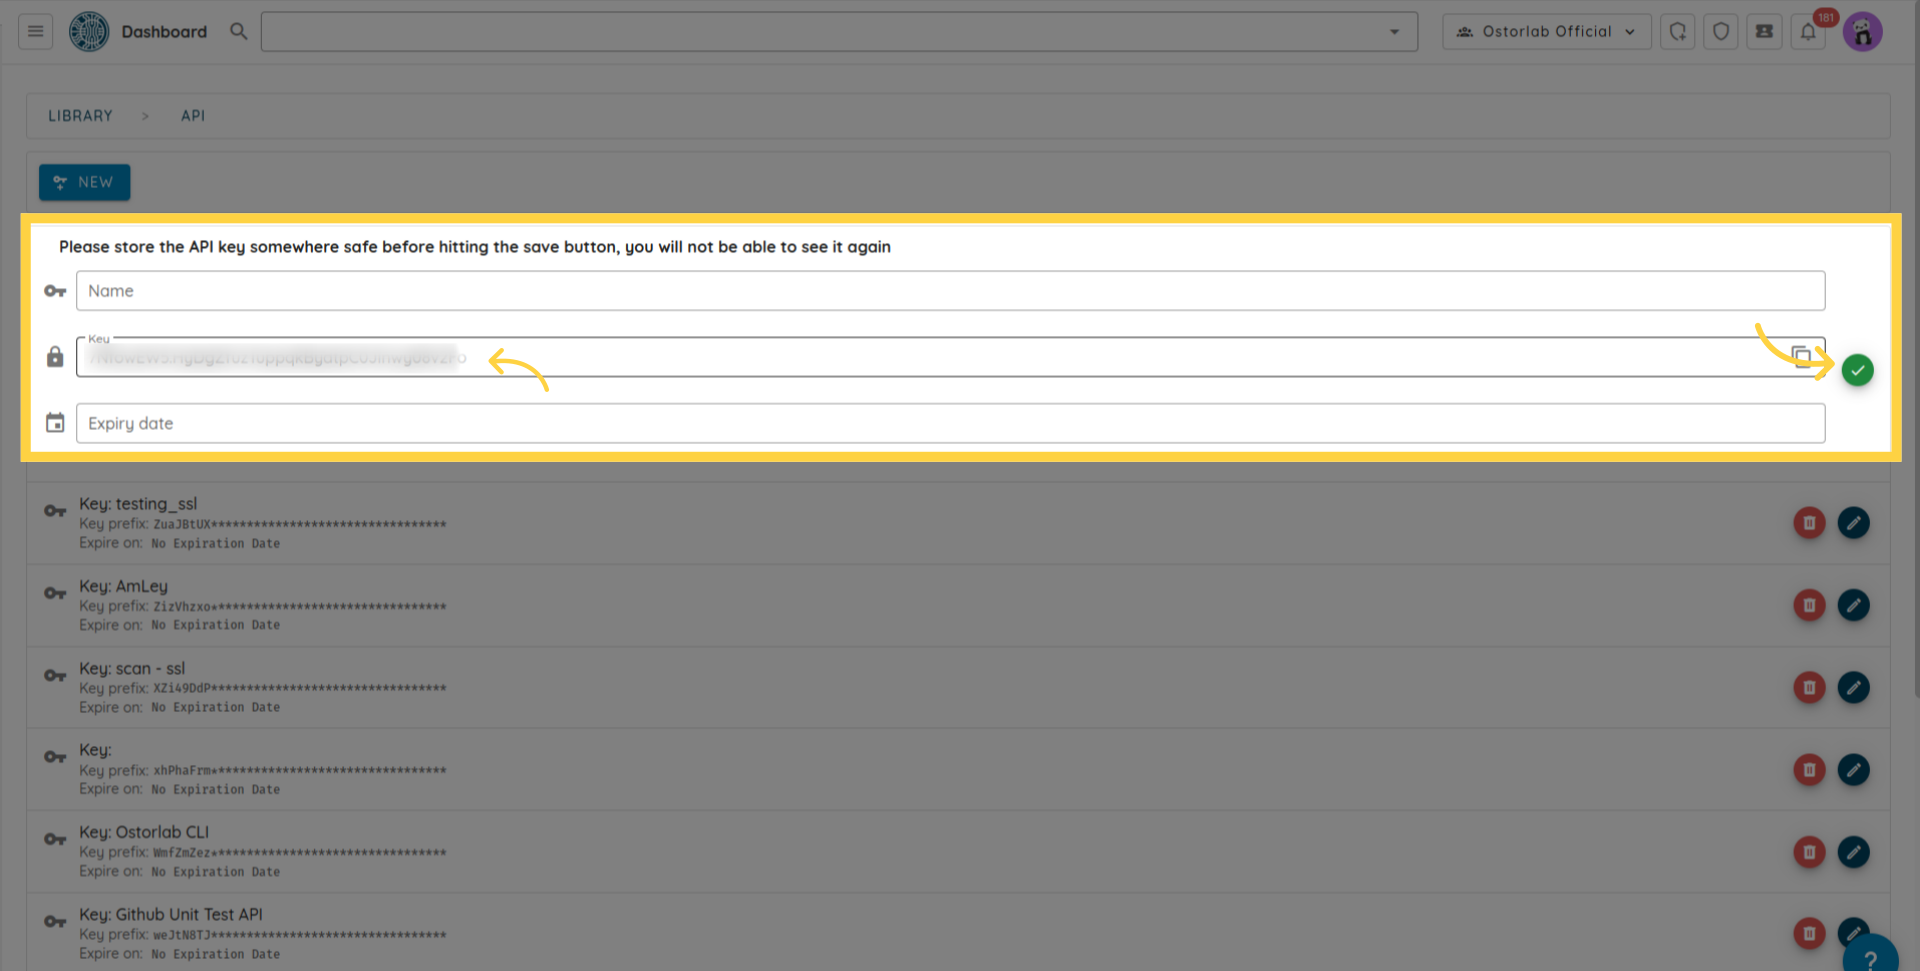
API Keyをコピーします(キーに名前と有効期限を追加できます)。最後に、保存ボタンをクリックしてキーを保存することを忘れないでください。
API Keyは、ヘッダーのキー X-Api-Key の値として使用され、それ以降の https://api.ostorlab.co/apis/graphql_token へのリクエストを認証します。
スキャンの作成
import json
import requests

query = '''
mutation MobileScan($title: String!, $assetType: String!, $application: Upload!, $sboms: [Upload], $scanProfile: String!, $credentialIds: [Int]) {
  createMobileScan(title: $title, assetType: $assetType, application: $application, sboms: $sboms, scanProfile: $scanProfile, credentialIds: $credentialIds) {
    scan {
      id
    }
  }
}
'''

# AuthorizationヘッダーにAPI Keyを設定します。
api_key = "XXXXXXXXXXX"
headers = {"X-Api-Key": f"{api_key}"}
# 変数
title = "scan_title"
asset_type = "android"
scan_profile = "Fast Scan"
data = {"operations": json.dumps({"query":query,"variables": {"title":title,"assetType":asset_type,"application": None,"scanProfile": scan_profile,},}), "map": json.dumps({"0": ["variables.application"]}),}
path_to_file = "my_full_path"
# クエリのPOSTリクエストを送信します。
with open(path_to_file, "rb") as f:
    request = requests.post(url='https://api.ostorlab.co/apis/graphql_token/',
                          data=data,
                          files={"0": f.read()},
                          headers=headers)
    print(request.json())
curl -v -X POST https://api.ostorlab.co/apis/graphql \
--header "X-Api-Key: $API_KEY" \
-F 'operations={"query": "mutation newMobileScan($title: String!, $assetType: String!, \
$application: Upload!, $scanProfile: String!) { createMobileScan(title: $title, assetType:$assetType, \
application: $application, scanProfile: $scanProfile) {scan {id }  }}", "variables": \
{"title": "test_title", "assetType": "android", "application": null, "scanProfile": "$SCAN_PROFILE"}}' \
-F 'map={"0": ["variables.application"]}' -F "0=@$PATH_APPLICATION"
スキャンの進行状況を抽出する
import requests

query = '''
query {
  scans {
    scans {
      id
      title
      progress
    }
  }
}
'''

# AuthorizationヘッダーにAPI Keyを設定します。
api_key = "XXXXXXXXXXX"
headers = {"X-Api-Key": f"{api_key}"}
# クエリのPOSTリクエストを送信します。
request = requests.post(url='https://api.ostorlab.co/apis/graphql_token/',
                      json={"query": query},
                      headers=headers)
print(request.json())
curl -v -X POST https://api.ostorlab.co/apis/graphql \
--header 'Content-Type: application/json' \
--header "X-Api-Key: $API_KEY" \
--data '{"query": "query {scans { scans { id title  progress }}}"}'
スキャンのチケットを抽出する
import requests

query = '''
query tickets($scanId: Int) {
    tickets(scanId: $scanId) {
    tickets{
      id
      withinSlo
      status
      priority
      }
    }
  }
'''

# 変数
scan_id = XXXXX
# AuthorizationヘッダーにAPI Keyを設定します。
api_key = "XXXXXXXXXXX"
headers = {"X-Api-Key": f"{api_key}"}
# クエリのPOSTリクエストを送信します。
request = requests.post(url='https://api.ostorlab.co/apis/graphql_token/',
                      json={"query": query, "variables": {"scanId": scan_id}},
                      headers=headers)
print(request.json())
curl -v -X POST https://api.ostorlab.co/apis/graphql \
--header 'Content-Type: application/json' \
--header "X-Api-Key: $API_KEY" \
--data '{"query": "query tickets($scanId: Int) { tickets(scanId: $scanId) { tickets { id withinSlo status priority } } }", "variables": {"scanId": $SCAN_ID}}'
スキャンの作成 with SBOM
import json
import requests
import pathlib

query = '''
mutation MobileScan($title: String!, $assetType: String!, $application: Upload!, $sboms: [Upload], $scanProfile: String!) {
  createMobileScan(title: $title, assetType: $assetType, application: $application, sboms: $sboms, scanProfile: $scanProfile) {
    scan {
      id
    }
  }
}
'''

# AuthorizationヘッダーにAPI Keyを設定します。
api_key = "XXXXXXXXXXX"
headers = {"X-Api-Key": f"{api_key}"}

# 変数
title = "scan_with_sbom"
asset_type = "android"
scan_profile = "Fast Scan"
path_to_apk = "your_apk.apk"
path_to_sboms = ["gradle.lockfile"]

# データ
data = {
    "operations": json.dumps({
        "query": query,
        "variables": {
            "title": title,
            "assetType": asset_type,
            "application": None,
            "sboms": [None],  # 1つのアイテムのみ
            "scanProfile": scan_profile
        }
    }),
    "map": json.dumps({
        "0": ["variables.application"],
        "1": ["variables.sboms.0"]
    })
}

# クエリのPOSTリクエストを送信します
apk_content = pathlib.Path(path_to_apk).read_bytes()
sbom_content = pathlib.Path(path_to_sboms[0]).read_bytes()
response = requests.post(
    url='https://api.ostorlab.co/apis/graphql_token/',
    data=data,
    files={
        "0": apk_content,
        "1": sbom_content
    },
    headers=headers
)
print(response.json())
curl -v -X POST https://api.ostorlab.co/apis/graphql \
--header "X-Api-Key: $API_KEY" \
-F 'operations={"query": "mutation MobileScan($title: String!, $assetType: String!, $application: Upload!, $sboms: [Upload], $scanProfile: String!) { createMobileScan(title: $title, assetType: $assetType, application: $application, sboms: $sboms, scanProfile: $scanProfile) { scan { id } } }", "variables": {"title": "scan_with_sbom", "assetType": "android", "application": null, "sboms": [null], "scanProfile": "Fast Scan"}}' \
-F 'map={"0": ["variables.application"], "1": ["variables.sboms.0"]}' \
-F "0=@$PATH_APK" \
-F "1=@$PATH_SBOM"
スキャンの作成 with test credentials
テスト用の認証情報を作成する
シンプルなログインとパスワードの認証情報を作成する例:
import json
import requests

query = '''
    mutation CreateTestCredentials($credentials: TestCredentialsInput!) {
          createTestCredentials(testCredentials: $credentials) {
            testCredentials {
              ... on LoginPasswordTestCredentials {
                id
                credentialName
                login
                password
                type
                url
              }
            }
          }
        }
'''


# AuthorizationヘッダーにAPIキーを設定する
api_key = "XXXXXXXXXX"
headers = {"X-Api-Key": f"{api_key}"}

# 変数
variables = {
    "credentials": {
        "credentialName": "login_creds",
        "loginPassword": {
            "login": "fake_login",
            "password": "fake_password",
            "url": "fake_url"
        },
    }
}

# データ
data = {
    "query": query,
    "variables": variables
}

# クエリのPOSTリクエストを送信します
response = requests.post(
    url='https://api.ostorlab.co/apis/graphql_token/',
    json=data,
    headers=headers
)
print(response.json())
curl -X POST https://api.ostorlab.co/apis/graphql_token/ -H "X-Api-Key: $API_KEY" -H "Content-Type: application/json" -d '{
  "query": "mutation CreateTestCredentials($credentials: TestCredentialsInput!) { createTestCredentials(testCredentials: $credentials) { testCredentials { ... on LoginPasswordTestCredentials { id credentialName login password type url } } } }",
  "variables": {
    "credentials": {
      "credentialName": "login_creds",
      "loginPassword": {
        "login": "fake_login",
        "password": "fake_password",
        "url": "fake_url"
      }
    }
  }
}'
カスタムのテスト用認証情報を作成する例:
import json
import requests

query = '''
    mutation CreateTestCredentials($credentials: TestCredentialsInput!) {
      createTestCredentials(testCredentials: $credentials) {
        testCredentials {
          ... on CustomTestCredentials {
            id
            credentialName
            credentials {
              name
              value
            }
          }
        }
      }
    }
'''


# AuthorizationヘッダーにAPIキーを設定する
api_key = "XXXXXXXXXXXXX"
headers = {"X-Api-Key": f"{api_key}"}

# 変数
variables = {
        "credentials": {
            "credentialName": "testCustomCredentials",
            "custom": {
                "credentials": [
                    {"name": "a", "value": "b"},
                    {"name": "a2", "value": "b2"},
                ],
            },
        }
    }

# データ
data = {
    "query": query,
    "variables": variables
}

# クエリのPOSTリクエストを送信します
response = requests.post(
    url='https://api.ostorlab.co/apis/graphql_token/',
    json=data,
    headers=headers
)
print(response.json())
curl -X POST https://api.ostorlab.co/apis/graphql_token/ \
-H "X-Api-Key: $API_KEY" \
-H "Content-Type: application/json" \
-d '{
  "query": "mutation CreateTestCredentials($credentials: TestCredentialsInput!) { createTestCredentials(testCredentials: $credentials) { testCredentials { ... on CustomTestCredentials { id credentialName credentials { name value } } } } }",
  "variables": {
    "credentials": {
      "credentialName": "testCustomCredentials",
      "custom": {
        "credentials": [
          { "name": "a", "value": "b" },
          { "name": "a2", "value": "b2" }
        ]
      }
    }
  }
}'
テスト用の認証情報をクエリする
import requests

query = '''
    query {
      testsCredentials(page: 1, numberElements: 10) {
        pageInfo {
          count
          numPages
        }
        testsCredentials {
          __typename
          ... on LoginPasswordTestCredentials {
            credentialName
            id
            login
            password
            role
            url
          }
          ... on CreditCardTestCredentials {
            id
            credentialName
            creditCardNumber
            expirationDate
            name
            cvv
          }
          ... on AddressTestCredentials {
            id
            credentialName
            addressLine
            city
            zipCode
            country
          }
          ... on EmailTestCredentials {
            id
            credentialName
            email
          }
          ... on PhoneNumberTestCredentials {
            id
            credentialName
            phoneNumber
          }
          ... on ScriptTestCredentials {
            id
            credentialName
            script
          }
          ... on TlsCertificateTestCredentials {
            id
            credentialName
            tlsCertificate
          }
          ... on CustomTestCredentials {
            id
            credentialName
            credentials {
              name
              value
            }
          }
          ... on TestHeaders {
            id
            credentialName
            testHeaders {
              name
              value
            }
          }
          ... on BasicTestCredentials {
            id
            credentialName
            login
            password
          }
        }
      }
    }
'''

# AuthorizationヘッダーにAPI Keyを設定します。
api_key = "XXXXXXXXXXX"
headers = {"X-Api-Key": f"{api_key}"}

# クエリのPOSTリクエストを送信します
response = requests.post(
    url='https://api.ostorlab.co/apis/graphql_token/',
    json={"query": query},
    headers=headers
)
print(response.json())
curl -v -X POST https://api.ostorlab.co/apis/graphql \
--header 'Content-Type: application/json' \
--header "X-Api-Key: $API_KEY" \
--data '{"query": "query { testsCredentials(page: 1, numberElements: 10) { pageInfo { count numPages } testsCredentials { __typename ... on LoginPasswordTestCredentials { credentialName id login password role url } ... on CreditCardTestCredentials { id credentialName creditCardNumber expirationDate name cvv } ... on AddressTestCredentials { id credentialName addressLine city zipCode country } ... on EmailTestCredentials { id credentialName email } ... on PhoneNumberTestCredentials { id credentialName phoneNumber } ... on ScriptTestCredentials { id credentialName script } ... on TlsCertificateTestCredentials { id credentialName tlsCertificate } ... on CustomTestCredentials { id credentialName credentials { name value } } ... on TestHeaders { id credentialName testHeaders { name value } } ... on BasicTestCredentials { id credentialName login password } } } }"}'
Create a scan with test credentials
import json
import requests

query = '''
mutation MobileScan($title: String!, $assetType: String!, $application: Upload!, $scanProfile: String!, $credentialIds: [Int]) {
  createMobileScan(title: $title, assetType: $assetType, application: $application, scanProfile: $scanProfile, credentialIds: $credentialIds) {
    scan {
      id
    }
  }
}
'''

# AuthorizationヘッダーにAPI Keyを設定します。
api_key = "XXXXXXXXXXX"
headers = {"X-Api-Key": f"{api_key}"}

# 変数
title = "scan_with_test_credentials"
asset_type = "android"
scan_profile = "Full Scan"
path_to_apk = "your_apk.apk"

# スキャンで使用する認証情報ID。テスト用認証情報を作成する前のステップから認証情報IDを取得できます。
credential_ids = [123]

# データ
data = {
    "operations": json.dumps({
        "query": query,
        "variables": {
            "title": title,
            "assetType": asset_type,
            "application": None,
            "scanProfile": scan_profile,
            "credentialIds": credential_ids
        }
    }),
    "map": json.dumps({
        "0": ["variables.application"]
    })
}

# クエリのPOSTリクエストを送信します
apk_content = pathlib.Path(path_to_apk).read_bytes()
response = requests.post(
    url='https://api.ostorlab.co/apis/graphql_token/',
    data=data,
    files={
        "0": apk_content
    },
    headers=headers
)
print(response.json())
curl -v -X POST https://api.ostorlab.co/apis/graphql \
--header "X-Api-Key: $API_KEY" \
-F 'operations={"query": "mutation MobileScan($title: String!, $assetType: String!, $application: Upload!, $scanProfile: String!, $credentialIds: [Int]) { createMobileScan(title: $title, assetType: $assetType, application: $application, scanProfile: $scanProfile, credentialIds: $credentialIds) { scan { id } } }", "variables": {"title": "scan_with_test_credentials", "assetType": "android", "application": null, "scanProfile": "Full Scan", "credentialIds": [123]}}' \
-F 'map={"0": ["variables.application"]}' \
-F "0=@$PATH_APK"
スキャンの作成 with on prem scanner
- ステップ 1: 利用可能なスキャナーを取得する
スキャンを作成する前に、まずスキャナーIDを特定する必要があります。以下のクエリを使用して、組織で利用可能なスキャナーのリストを取得できます:
import json
import requests

query_scanners = '''
query GetScanners {
  scanners {
    scanners {
      id
      uuid
      name
      description
    }
  }
}
'''

# AuthorizationヘッダーにAPI Keyを設定します。
api_key = "XXXXXXXXXXX"
headers = {"X-Api-Key": f"{api_key}"}
path_to_file = "my_full_path"
data = {"operations": json.dumps({"query": query_scanners}) , "map": json.dumps({}),}
# クエリのPOSTリクエストを送信します。
with open(path_to_file, "rb") as f:
    request = requests.post(url='https://api.ostorlab.co/apis/graphql_token/',
                          data=data,
                          files={"0": f.read()},
                          headers=headers)
    print(request.json())
curl -v -X POST "https://api.ostorlab.co/apis/graphql_token/" \
  -H "X-Api-Key: $API_KEY" \
  -F 'operations={
    "query": "query GetScanners { scanners { scanners { id uuid name description } } }"
  }' \
  -F 'map={}' \
  -F "0=@$PATH_TO_FILE"
このリクエストにより、アカウントに関連付けられたスキャナーのリストが返されます。スキャンを作成する際に使用したいスキャナーのIDを書き留めておいてください。
- ステップ 2: Webスキャンを作成する
正しいスキャナーIDを特定したら、スキャンのタイトル、ターゲットURL、スキャンプロファイル、およびスキャナーIDを指定することで、新しいWebスキャンを作成できます。
import json
import requests

query = '''
mutation NewWebScan($title: String, $urls: [String]!, $scanProfile: String!,  $scannerId: Int,) {
  createWebScan(title: $title, urls: $urls, scanProfile: $scanProfile,  scannerId: $scannerId,) {
    scan {
      id
    }
  }
}
'''

# AuthorizationヘッダーにAPI Keyを設定します。
api_key = "XXXXXXXXXXX"
headers = {"X-Api-Key": f"{api_key}"}
# 変数
title = "scan_title"
urls = ["example.com"] # List of urls to scan.
scan_profile = "Full Web Scan"
scanner_id = 000000 # Replace with your scanner id.
path_to_file = "my_full_path"

data = {"operations": json.dumps({"query":query, "variables": {"title": title, "urls": urls,
                           "scanProfile": scan_profile, "scannerId": scanner_id
                          }}) , "map": json.dumps({}),}
# クエリのPOSTリクエストを送信します。
with open(path_to_file, "rb") as f:
    request = requests.post(url='https://api.ostorlab.co/apis/graphql_token/',
                          data=data,
                          files={"0": f.read()},
                          headers=headers)
    print(request.json())
curl -v -X POST "https://api.ostorlab.co/apis/graphql_token/" \
  -H "X-Api-Key: $API_KEY" \
  -F 'operations={
    "query": "mutation NewWebScan($title: String, $urls: [String]!, $scanProfile: String!, $scannerId: Int) { createWebScan(title: $title, urls: $urls, scanProfile: $scanProfile, scannerId: $scannerId) { scan { id } } }",
    "variables": {
      "title": "scan_title",
      "urls": ["example.com"],
      "scanProfile": "Full Web Scan",
      "scannerId": 000000
    }
  }' \
  -F 'map={}' \
  -F "0=@$PATH_TO_FILE"
PDFのダウンロード
PDFレポートをダウンロードするには、以下の3つのステップに従う必要があります:
1- PDFジョブの作成をトリガーします。このステップにはスキャンIDが必要であり、ジョブID(Job Id)が返されます。
2- ジョブのステータスを確認し、ステータスが "SUCCESS" になるまで待機します。
3- ジョブIDを使用してPDFをダウンロードします。
import json
import requests
import time
import sys

API_KEY = "XXXXXXXXXXX" # 有効なAPI Keyに置き換えてください。
API_URL = 'https://api.ostorlab.co/apis/graphql_token/'
HEADERS = {"X-Api-Key": API_KEY}
PDF_OUTPUT_PATH = '/tmp/f123.pdf'
Time_SLEEP = 10

def generate_pdf_job(scan_id):
    """PDFの生成を開始し、ジョブIDを返します"""
    query = '''
    mutation generatePdf($scanId: Int!, $riskRatings: [RiskRating]!, $statuses: [TicketStatusEnum]!, $pdfReportTemplate: PDFReportTemplate!, $standards: [ScanCategoryGroupEnum]) {
        generatePdf(scanId: $scanId, riskRatings: $riskRatings, statuses: $statuses, pdfReportTemplate: $pdfReportTemplate, standards: $standards) {
          job {
            id
            status
          }
        }
    }
    '''

    variables = {
        "scanId": scan_id,
        "riskRatings": ["CRITICAL", "HIGH", "MEDIUM", "LOW", "POTENTIALLY", "HARDENING"],
        "statuses": ["OPEN", "REOPEN"],
        "standards": [],
        "pdfReportTemplate": "full_report"
    }

    response = requests.post(API_URL, json={"query": query, "variables": variables}, headers=HEADERS)
    response_data = response.json()

    if 'errors' in response_data:
        print("PDF生成中のエラー:", response_data, file=sys.stderr)
        sys.exit(1)

    return response_data['data']['generatePdf']['job']['id']

def wait_for_job_completion(job_id):
    """ジョブが完了するまで待機します"""
    query = """
    query job($jobId: String!) {
        job(jobId: $jobId) {
            id
            status
        }
    }
    """

    while True:
        response = requests.post(API_URL, json={"query": query, "variables": {"jobId": job_id}}, headers=HEADERS)
        status = response.json()['data']['job']['status']

        if status == 'SUCCESS':
            break
        time.sleep(Time_SLEEP)

def download_pdf(job_id, output_path=PDF_OUTPUT_PATH):
    """生成されたPDFをダウンロードします"""
    response = requests.get(f'https://api.ostorlab.co/apis/job/result/{job_id}/', headers=HEADERS)
    with open(output_path, 'wb') as f:
        f.write(response.content)

def main(scan_id, output_path=PDF_OUTPUT_PATH):
    """PDFを生成およびダウンロードするためのメイン関数"""
    try:
        print("PDFの生成を開始しています...")
        job_id = generate_pdf_job(scan_id)
        print(f"IDでジョブが作成されました: {job_id}")

        print("ジョブの完了を待機しています...")
        wait_for_job_completion(job_id)

        print("PDFをダウンロードしています...")
        download_pdf(job_id, output_path)
        print(f"PDFが正常にダウンロードされました: {output_path}")
    except Exception as e:
        print(f"エラーが発生しました: {str(e)}", file=sys.stderr)
        sys.exit(1)

scan_id = XXXXXXXXXXX # スキャンIDに置き換えてください。
main(scan_id)
curl -X POST https://api.ostorlab.co/apis/graphql_token/ -H "X-Api-Key: $API_KEY" -H "Content-Type: application/json" -d '{
  "query": "mutation generatePdf($scanId: Int!, $riskRatings: [RiskRating]!, $statuses: [TicketStatusEnum]!, $pdfReportTemplate: PDFReportTemplate!, $standards: [ScanCategoryGroupEnum]) { generatePdf(scanId: $scanId, riskRatings: $riskRatings, statuses: $statuses, pdfReportTemplate: $pdfReportTemplate, standards: $standards) { job { id status } } }",
  "variables": {
    "scanId": $SCAN_ID,
    "riskRatings": ["CRITICAL", "HIGH", "MEDIUM", "LOW", "POTENTIALLY", "HARDENING"],
    "statuses": ["OPEN", "REOPEN"],
    "standards": [],
    "pdfReportTemplate": "full_report"
  }
}'
ジョブIDのステータスを抽出し、以下のクエリを使用してジョブのステータスを抽出します(XXXXXXXはジョブIDです):
``` shell
curl -v -X POST https://api.ostorlab.co/apis/graphql \
--header 'Content-Type: application/json' \
--header "X-Api-Key: $API_KEY" \
--data '{"query": "query { job(jobId: XXXXXXX) { id status } }"}'
```
ステータスが SUCCESS になったら、以下のクエリを実行してPDFをダウンロードできます:
``` shell
curl --header "X-Api-Key: $API_KEY" "https://api.ostorlab.co/apis/job/result/<job_id>/" -o <output_path>
```
まとめとして、本ガイドではOstorlab APIの概要を説明しました。GraphiQL Webアプリケーションやスクリプトを含む、APIを利用するための様々な方法を探索しました。さらに、リファレンスとして機能する一般的なクエリのセットについても確認しました。